<?xml version="1.0" encoding="utf-8"?><feed xmlns="http://www.w3.org/2005/Atom" ><generator uri="https://jekyllrb.com/" version="4.3.3">Jekyll</generator><link href="https://www.docsastests.com/atom.xml" rel="self" type="application/atom+xml" /><link href="https://www.docsastests.com/" rel="alternate" type="text/html" /><updated>2026-06-13T15:27:36+00:00</updated><id>https://www.docsastests.com/atom.xml</id><title type="html">Docs as Tests</title><subtitle>Keep your docs and product in sync.</subtitle><author><name>mannysilva</name></author><entry><title type="html">Docs as Tests &amp;amp; AI book is Now Available!</title><link href="https://www.docsastests.com/docs-as-tests-book/" rel="alternate" type="text/html" title="Docs as Tests &amp;amp; AI book is Now Available!" /><published>2026-05-07T00:00:00+00:00</published><updated>2026-05-07T00:00:00+00:00</updated><id>https://www.docsastests.com/docs-as-tests-and-ai-book</id><content type="html" xml:base="https://www.docsastests.com/docs-as-tests-book/"><![CDATA[<p>I’m thrilled to announce that my new book, “Docs as Tests &amp; AI: A Strategy for Self-Healing Technical Documentation,” is now available! It’s the follow-up to <em>Docs as Tests</em>, written for the new reality every documentation team is navigating: AI is in the pipeline. It generates content, consumes your docs through chatbots and RAG, and executes your procedures as agents — and every error along the way amplifies to thousands of users.<br />
<br />
<a href="https://amzn.to/4tOLOeS">Get your copy today!</a></p>

<h2 id="what-youll-learn">What You’ll Learn</h2>

<p><em>Docs as Tests &amp; AI</em> extends the original strategy to the four places AI shows up in your documentation pipeline, and shows you how to verify each one. By the end, you’ll be able to:</p>

<ul>
  <li>Identify the four AI integration points in your doc pipeline and what each one needs from testing</li>
  <li>Choose between probabilistic and deterministic verification based on cost, risk, and product cadence</li>
  <li>Write workflow documentation — project descriptions, agent definitions, plans, skills — that AI agents can actually execute</li>
  <li>Build self-healing systems that detect drift, diagnose the cause, fix the docs, verify the fix, and report what happened</li>
  <li>Establish governance frameworks that balance agent autonomy with the right amount of human oversight</li>
</ul>

<p>The book also includes lessons and case studies from teams at Anthropic, Avalara, Google, Kong, and Vercel — real numbers, real tradeoffs, and real workflows you can adapt.</p>

<h2 id="who-its-for">Who It’s For</h2>

<p>Technical writers, documentation engineers, developer advocates, and any team using AI in their documentation workflow, whether you’re generating drafts with an LLM, feeding docs into a chatbot or RAG system, or letting agents act on your procedures. The book assumes basic familiarity with documentation work but doesn’t require any prior experience with <em>Docs as Tests</em>.</p>

<p>With forewords by Scott Abel and Michael Iantosca.</p>

<h2 id="get-your-copy-today">Get Your Copy Today</h2>

<p>If your docs touch AI — or AI touches your docs — this book gives you the verification layer that makes the whole pipeline trustworthy.</p>

<p>Ready to make your AI-powered docs trustworthy? <a href="https://amzn.to/4tOLOeS">Get your copy today!</a></p>]]></content><author><name>Manny Silva</name></author><category term="docs-as-tests" /><category term="announcement" /><category term="ai" /><summary type="html"><![CDATA[I’m thrilled to announce that my new book, “Docs as Tests &amp; AI: A Strategy for Self-Healing Technical Documentation,” is now available! It’s the follow-up to Docs as Tests, written for the new reality every documentation team is navigating: AI is in the pipeline. It generates content, consumes your docs through chatbots and RAG, and executes your procedures as agents — and every error along the way amplifies to thousands of users. Get your copy today!]]></summary><media:thumbnail xmlns:media="http://search.yahoo.com/mrss/" url="https://www.docsastests.com/images/docs-as-tests-and-ai-book.png" /><media:content medium="image" url="https://www.docsastests.com/images/docs-as-tests-and-ai-book.png" xmlns:media="http://search.yahoo.com/mrss/" /></entry><entry><title type="html">AI-Assisted Test Generation: Let the LLM Write The Tests</title><link href="https://www.docsastests.com/ai-assisted-test-generation" rel="alternate" type="text/html" title="AI-Assisted Test Generation: Let the LLM Write The Tests" /><published>2026-03-18T00:00:00+00:00</published><updated>2026-03-18T00:00:00+00:00</updated><id>https://www.docsastests.com/ai-assisted-test-generation</id><content type="html" xml:base="https://www.docsastests.com/ai-assisted-test-generation"><![CDATA[<p>Writing documentation tests by hand is time-consuming. For a small docs site with a handful of procedures, it’s manageable. For a site with hundreds of how-to guides across multiple products and versions, it doesn’t scale. Every new guide needs tests, every product update needs test updates, and the backlog of untested docs keeps growing.</p>

<p>But what if the same LLMs that can read and summarize documentation could also write the tests for it?</p>

<p>That’s the idea behind AI-assisted test generation: use an LLM to convert documented procedures into executable test specifications, have a human review the output, and then run those tests deterministically from that point on. You pay the AI cost once during generation. After that, execution is deterministic. No LLM inference, no variability, no per-run API costs.</p>

<h2 id="generate-once-run-forever">Generate once, run forever</h2>

<p>Note where the AI sits in the workflow. The LLM is the <em>author</em> of the test code, not the <em>runtime</em>. It reads a how-to guide, interprets the steps, and produces a structured test specification. A human reviews that spec for correctness. Then a deterministic test runner executes it—no LLM involved at runtime, no variability between runs, no API costs per execution.</p>

<p>This is different from probabilistic testing, where an LLM evaluates docs at runtime by interpreting content and judging quality on each pass. Probabilistic approaches have their place (I cover them in <a href="https://amzn.to/4tOLOeS"><em>Docs as Tests &amp; AI</em></a>), but they introduce variability: the same input can produce different results across runs, and you’re paying for LLM inference every time. AI-assisted test generation avoids both issues by confining the AI to a one-time generation step.</p>

<p>The result is a test suite that behaves exactly like hand-written tests (deterministic, repeatable, and cheaper to run) but was created in a fraction of the time.</p>

<h2 id="how-it-works-in-practice">How it works in practice</h2>

<p><a href="https://github.com/doc-detective/agent-tools">Doc Detective’s agent tools</a> implement this pattern as a set of <a href="https://instructionmanuel.com/writing-skills-agents-can-execute">agent skills</a>. The <code class="language-plaintext highlighter-rouge">doc-detective-test</code> skill defines a workflow that converts documentation procedures into executable test specifications:</p>

<ol>
  <li><strong>Parse</strong> — Read a documentation file and identify step-by-step procedures</li>
  <li><strong>Generate</strong> — Convert each procedure into a structured test specification</li>
  <li><strong>Validate</strong> — Check that the generated spec is structurally correct (mandatory gate—the process stops here if validation fails)</li>
  <li><strong>Execute</strong> — Run the tests against the actual product</li>
  <li><strong>Analyze</strong> — Report results with failures mapped back to documentation sections</li>
  <li><strong>Fix</strong> — Optionally iterate on failing tests with confidence-based suggestions</li>
</ol>

<p>Here’s what that looks like with a concrete example. Say you have a getting-started guide:</p>

<div class="language-markdown highlighter-rouge"><div class="highlight"><pre class="highlight"><code><span class="gu">## Create an Account</span>
<span class="p">
1.</span> Navigate to https://example.com/signup
<span class="p">2.</span> Enter your email address
<span class="p">3.</span> Enter a password
<span class="p">4.</span> Click "Create Account"
<span class="p">5.</span> Verify you see the Dashboard
</code></pre></div></div>

<p>The LLM reads those steps and generates a Doc Detective test specification:</p>

<div class="language-json highlighter-rouge"><div class="highlight"><pre class="highlight"><code><span class="p">{</span><span class="w">
  </span><span class="nl">"tests"</span><span class="p">:</span><span class="w"> </span><span class="p">[</span><span class="w">
    </span><span class="p">{</span><span class="w">
      </span><span class="nl">"testId"</span><span class="p">:</span><span class="w"> </span><span class="s2">"create-account"</span><span class="p">,</span><span class="w">
      </span><span class="nl">"steps"</span><span class="p">:</span><span class="w"> </span><span class="p">[</span><span class="w">
        </span><span class="p">{</span><span class="w"> </span><span class="nl">"goTo"</span><span class="p">:</span><span class="w"> </span><span class="s2">"https://example.com/signup"</span><span class="w"> </span><span class="p">},</span><span class="w">
        </span><span class="p">{</span><span class="w"> </span><span class="nl">"type"</span><span class="p">:</span><span class="w"> </span><span class="p">{</span><span class="w"> </span><span class="nl">"keys"</span><span class="p">:</span><span class="w"> </span><span class="s2">"test@example.com"</span><span class="p">,</span><span class="w"> </span><span class="nl">"selector"</span><span class="p">:</span><span class="w"> </span><span class="s2">"#email"</span><span class="w"> </span><span class="p">}</span><span class="w"> </span><span class="p">},</span><span class="w">
        </span><span class="p">{</span><span class="w"> </span><span class="nl">"type"</span><span class="p">:</span><span class="w"> </span><span class="p">{</span><span class="w"> </span><span class="nl">"keys"</span><span class="p">:</span><span class="w"> </span><span class="s2">"SecurePass123!"</span><span class="p">,</span><span class="w"> </span><span class="nl">"selector"</span><span class="p">:</span><span class="w"> </span><span class="s2">"#password"</span><span class="w"> </span><span class="p">}</span><span class="w"> </span><span class="p">},</span><span class="w">
        </span><span class="p">{</span><span class="w"> </span><span class="nl">"click"</span><span class="p">:</span><span class="w"> </span><span class="s2">"Create Account"</span><span class="w"> </span><span class="p">},</span><span class="w">
        </span><span class="p">{</span><span class="w"> </span><span class="nl">"find"</span><span class="p">:</span><span class="w"> </span><span class="s2">"Dashboard"</span><span class="w"> </span><span class="p">}</span><span class="w">
      </span><span class="p">]</span><span class="w">
    </span><span class="p">}</span><span class="w">
  </span><span class="p">]</span><span class="w">
</span><span class="p">}</span><span class="w">
</span></code></pre></div></div>

<p>Each documentation step maps to a test action: navigation becomes <code class="language-plaintext highlighter-rouge">goTo</code>, text entry becomes <code class="language-plaintext highlighter-rouge">type</code>, interaction becomes <code class="language-plaintext highlighter-rouge">click</code>, and visual verification becomes <code class="language-plaintext highlighter-rouge">find</code>. The test runner (Doc Detective, in this case) executes these actions in a real browser and reports whether each step succeeded.</p>

<p>A critical middle step—spec validation—checks the generated spec before any test runs. The validator confirms that the <code class="language-plaintext highlighter-rouge">tests</code> array is well-formed, that each step contains exactly one recognized action, and that action parameters match expected types. This catches the most common LLM generation errors (hallucinated action names, malformed parameters, missing required fields) before they waste execution time.</p>

<h2 id="the-human-in-the-loop">The human in the loop</h2>

<p>AI-generated tests aren’t automatically correct. The LLM may interpret ambiguous documentation in unexpected ways, choose the wrong selector for an element, or miss context that isn’t explicitly stated in the docs.</p>

<p>That’s why human review is a required step, not an optional one. After generation, a person should check:</p>

<ul>
  <li><strong>Action mapping</strong> — Did the LLM correctly interpret each documentation step? A step that says “select your region” might map to a dropdown select, a radio button click, or a text input depending on the UI.</li>
  <li><strong>Selectors and identifiers</strong> — When the LLM couldn’t use plain text matching (like <code class="language-plaintext highlighter-rouge">{ "click": "Submit" }</code>), did it choose reasonable selectors that match your product? CSS selectors are brittle and should be a last resort.</li>
  <li><strong>Missing steps</strong> — Did the LLM capture implicit steps that the documentation assumes? Some guides assume the user is already signed in or has already configured a prerequisite.</li>
  <li><strong>Test data</strong> — Are the test values reasonable? Email addresses, passwords, and other inputs should be appropriate for a test environment, and any secrets should be stored as environment variables.</li>
</ul>

<p>The <code class="language-plaintext highlighter-rouge">doc-detective-test</code> skill includes a confidence scoring system for its fix loop: when a test fails and the agent proposes a fix, it assigns a confidence score (0–100). Fixes above a configurable threshold are applied automatically, while fixes below it are shown to the user for approval. This applies to initial generation, too. Outputs are drafts that needs review, not a finished product.</p>

<p>This is where the economics work out. Reviewing a test spec generated from a clean procedure takes minutes. Writing one from scratch takes significantly longer, especially for complex multi-step procedures. Multiply that across hundreds of guides, and the time savings are substantial.</p>

<h2 id="bootstrapping-test-coverage">Bootstrapping test coverage</h2>

<p>For teams with an existing docs site and zero test coverage, the <code class="language-plaintext highlighter-rouge">doc-detective-init</code> skill provides a bootstrapping workflow:</p>

<ol>
  <li><strong>Detect</strong> — Scan the repository for documentation files (Markdown, MDX, AsciiDoc, reStructuredText, HTML, DITA)</li>
  <li><strong>Configure</strong> — Generate a minimal Doc Detective configuration</li>
  <li><strong>Generate</strong> — Create test specifications for all identified procedures</li>
  <li><strong>Execute</strong> — Run all generated tests</li>
  <li><strong>Fix</strong> — Iterate on failures with confidence-based suggestions</li>
</ol>

<p>This takes a repository with no test infrastructure and produces a working test suite. The tests live alongside the docs in version control, run through the same CI pipelines, and produce the same pass/fail signals as hand-written tests.</p>

<p>The approach isn’t all-or-nothing. You can start with one guide, review the generated tests, and expand from there. Each generated spec is an independent file that can be reviewed, edited, and committed on its own timeline.</p>

<h2 id="injecting-tests-for-maintainability">Injecting tests for maintainability</h2>

<p>So now you have a pile of generated test specs—separate JSON files sitting alongside your docs. That works, but it creates a maintenance problem I wrote about in <a href="https://amzn.to/3NEqwAV"><em>Docs as Tests</em></a> because when tests live in separate files, they drift from the documentation they validate. Someone updates a procedure, forgets to update the corresponding spec, and now your tests are checking stale claims. The more specs you generate, the faster this drift compounds.</p>

<p>The solution is to take verified test specs and embedding them as inline comments directly in your documentation source files. The <code class="language-plaintext highlighter-rouge">doc-detective-inject</code> skill handles this. After tests pass validation and execution, it matches each test step to the documentation step it validates and inserts it as a comment:</p>

<div class="language-markdown highlighter-rouge"><div class="highlight"><pre class="highlight"><code><span class="gu">## Create an Account</span>

<span class="c">&lt;!-- test {"testId":"create-account", "detectSteps": false} --&gt;</span>
<span class="p">1.</span> Navigate to https://example.com/signup
<span class="c">&lt;!-- step {"goTo":"https://example.com/signup"} --&gt;</span>
<span class="p">2.</span> Enter your email address
<span class="nv">&lt;!-- step {"type":{"keys":"test@example.com","selector":"#email"}} --&gt;</span>
<span class="p">3.</span> Enter a password
<span class="c">&lt;!-- step {"type":{"keys":"SecurePass123!","selector":"#password"}} --&gt;</span>
<span class="p">4.</span> Click "Create Account"
<span class="c">&lt;!-- step {"click":"Create Account"} --&gt;</span>
<span class="p">5.</span> Verify you see the Dashboard
<span class="c">&lt;!-- step {"find":"Dashboard"} --&gt;</span>
<span class="c">&lt;!-- test end --&gt;</span>
</code></pre></div></div>

<p>Readers see normal documentation (the comments don’t render), but people or agents editing the file see the test assertions right next to the steps they check. When someone rewrites step 4 to say “Click <strong>Sign Up</strong>” instead of “Click <strong>Create Account</strong>,” the inline test comment is staring right at them. The coupling is proximity-based, not just conceptual.</p>

<p>This matters more at scale. A team with three hundred guides probably can’t keep separate docs and tssts in sync without heavy automation or process, and process is fragile. Inline tests eliminate the synchronization problem entirely because the test <em>is</em> the documentation file. One file to update, one file to review, one file to commit. Tests detected directly from documentation syntax is even better, but that’s a different discussion.</p>

<p>Injection also changes what CI catches. With separate spec files, a renamed button breaks the test, and the failure points to the spec file. The writer has to trace back to figure out which doc needs attention. With inline tests, the failure points directly to the documentation line where the assertion lives. The feedback loop is shorter.</p>

<p>You don’t have to inject every test. Some teams inject tests for critical procedures and keep separate specs for broader coverage or for content formats that don’t support comments. The point is to co-locate tests with content wherever you can, because proximity is the cheapest form of maintenance discipline.</p>

<h2 id="fitting-into-ci">Fitting into CI</h2>

<p>Once tests are generated and reviewed—whether they live as separate spec files or as injected inline comments. They’re just files in your repository, and they run the same way hand-written tests do:</p>

<div class="language-bash highlighter-rouge"><div class="highlight"><pre class="highlight"><code>npx doc-detective <span class="nt">--input</span> docs/ <span class="nt">--output</span> .doc-detective/results/
</code></pre></div></div>

<p>In a CI pipeline, this means every pull request that changes documentation can automatically verify that the documented procedures still work. The tests are deterministic, so the same input produces the same output every time with no hard-to-forecast LLM costs per run.</p>

<p>This is <a href="https://www.docsastests.com/kong-case-study">the same pattern Kong uses</a> for their docs. Their copy-paste-down-the-page design makes tests detectable from docs content. AI-assisted generation automates that detection step.</p>

<p>The feedback loop is fast: change docs → tests run → failures point to specific documentation steps that no longer match the product. Whether those tests were written by a person or generated by an AI doesn’t matter to the CI system. What matters is that they exist and they run.</p>

<h2 id="where-this-leads">Where this leads</h2>

<p>AI-assisted test generation is one piece of a broader pipeline. The generation step uses an LLM. The execution step is deterministic. Future steps, including self-healing docs systems that automatically fix failures and test coverage analysis that identifies untested procedures, build on the same foundation.</p>

<p>The skills that power this workflow follow the design principles I wrote about on <a href="https://www.instructionmanuel.com/writing-skills-agents-can-execute">instructionmanuel.com</a>: single responsibility, testable in isolation, documented interface, composable. The generation, validation, execution, and injection steps are separate skills that compose into a larger workflow. Each skill can be validated independently using deterministic quality checks.</p>

<p>You don’t need to hand-write every test. Use an LLM to generate the first draft, review it, then let deterministic execution handle the rest. The tests themselves are ordinary files that are readable, editable, and version-controlled but happen to have been authored faster than a person could write them from scratch.</p>]]></content><author><name>Manny Silva</name></author><category term="docs-as-tests" /><summary type="html"><![CDATA[Writing documentation tests by hand is time-consuming. For a small docs site with a handful of procedures, it’s manageable. For a site with hundreds of how-to guides across multiple products and versions, it doesn’t scale. Every new guide needs tests, every product update needs test updates, and the backlog of untested docs keeps growing.]]></summary><media:thumbnail xmlns:media="http://search.yahoo.com/mrss/" url="https://www.docsastests.com/images/ai-assisted-test-generation.webp" /><media:content medium="image" url="https://www.docsastests.com/images/ai-assisted-test-generation.webp" xmlns:media="http://search.yahoo.com/mrss/" /></entry><entry><title type="html">How Kong Achieved 91% AI Chatbot Accuracy Through Docs Testing</title><link href="https://www.docsastests.com/kong-case-study" rel="alternate" type="text/html" title="How Kong Achieved 91% AI Chatbot Accuracy Through Docs Testing" /><published>2026-01-08T00:00:00+00:00</published><updated>2026-01-08T00:00:00+00:00</updated><id>https://www.docsastests.com/kong-case-study</id><content type="html" xml:base="https://www.docsastests.com/kong-case-study"><![CDATA[<p>Kong’s documentation team fundamentally changed how their docs relate to their product. After rebuilding their CLI how-to guides to be testable, their AI-powered documentation chatbot accurately answered 91% of user questions with confidence, up from 84%. That 7% improvement wasn’t the result of better AI models or more sophisticated prompt engineering—it came from making sure every how-to guide on their site actually works, every time.</p>

<p><em>“We’re able to answer 91% of questions with a certain answer.”</em></p>

<p>— Diana Breza, Technical Writer at Kong</p>

<h2 id="about-kong">About Kong</h2>

<p>Kong is the AI and API connectivity company that enables you to build, run, discover, govern, and monetize all of your AI and API connectivity. . With multiple products spanning cloud platforms, on-premises deployments, and developer tooling, Kong’s docs team is challenged to keep their technical content accurate across a constantly evolving product portfolio.</p>

<p>The docs team consists of approximately six technical writers plus Fabian Rodriguez, a software engineer who focuses on docs tooling and infrastructure. Diana Breza presented Kong’s docs testing approach at <a href="https://www.writethedocs.org/">Write the Docs Berlin</a>, showcasing how their team transformed docs quality through automated testing.</p>

<h2 id="the-challenge-broken-commands-and-user-frustration">The Challenge: Broken Commands and User Frustration</h2>

<p>Before rebuilding their how-to guides, Kong’s team faced a common but painful problem: users would copy commands from the docs, paste them into their terminals, and nothing would work.</p>

<p><em>“One of the most important pieces of feedback that we got for the old site was that people tried stuff and it didn’t work. They’d copy commands or whatever and those didn’t work.”</em></p>

<p>— Fabian Rodriguez, Software Engineer at Kong</p>

<p>This wasn’t just frustrating for users. It was nearly impossible for the docs team to manage. Kong has multiple products, frequent releases, third-party integrations, and various deployment options. Keeping track of which commands still worked and which procedures needed updates would be overwhelming for a team of any size, and it certainly was for them.</p>

<p>Manually testing docs before each release simply didn’t scale.</p>

<h2 id="the-solution-tests-derived-directly-from-docs">The Solution: Tests Derived Directly from Docs</h2>

<p>Kong’s approach to doc testing differs from what many other organizations have attempted. Instead of creating a parallel test suite that mirrors the docs, which introduces its own drift and maintenance burden, they built tooling that derives tests directly from the docs content itself.</p>

<h3 id="copy-paste-down-the-page-design">Copy-Paste-Down-the-Page Design</h3>

<p>Kong’s approach centered on a single docs design principle: every how-to guide should be completable by copying and pasting commands sequentially down the page. This means each guide includes all prerequisites, all necessary setup steps, all commands, and a verification step at the end.</p>

<p>This design serves two purposes. First, it creates a better user experience. During user testing with internal employees, Kong discovered something remarkable:</p>

<p><em>“When we would show them a how-to doc, they’d scroll up and down the page trying to read it. When we told them you can copy and paste down the page, it’s like this light bulb moment. So few docs have that. Once they learned they could do that, they just took off down the page and within several minutes they were done. Whereas normally it would have taken them an hour maybe with all the different options you could configure.”</em></p>

<p>— Diana Breza</p>

<p>Second, this design makes automated testing straightforward. If a human can complete a guide by copying commands sequentially, so can a machine.</p>

<h3 id="structured-content-with-yaml-blocks">Structured Content with YAML Blocks</h3>

<p>Kong’s docs use Markdown files with <a href="https://developer.konghq.com/contributing/#how-to-and-reference-page-blocks">YAML-based code blocks</a> that define the instructions. Writers <a href="https://github.com/Kong/developer.konghq.com/blob/main/docs/front-matter-reference.md">specify metadata</a> like which product versions a guide applies to, what prerequisites are needed, and what entities must be created. The platform then <a href="https://github.com/Kong/developer.konghq.com/blob/main/tools/automated-tests/README.md">generates both the user-facing docs and the machine-readable test instructions</a> from the same source.</p>

<p>This approach eliminates a common failure mode: docs and tests drifting apart. When the source is the same, they can’t diverge. If the docs are wrong, the test fails. If the test passes, the docs work.</p>

<h3 id="automated-daily-testing">Automated Daily Testing</h3>

<p>Kong runs their doc tests daily through GitHub Actions. The test runner launches a headless browser, navigates to each how-to guide, extracts the code blocks, spins up the necessary Docker containers, and executes each command in sequence. Validation steps confirm that API calls return expected responses and that the documented workflow produces the promised results.</p>

<p>When tests fail, the system generates an instruction file, a minified version of the guide showing exactly what commands were executed. This makes debugging straightforward and allows the team to share reproducible failure cases with product engineering.</p>

<h2 id="influencing-product-development">Influencing Product Development</h2>

<p>One unexpected outcome: Kong’s docs requirements actually influenced product development. The team wanted users to be able to configure the product entirely through copy-paste commands without creating intermediate files. This required changes to Kong’s CLI tool, decK.</p>

<p><em>“We wanted the experience to be really smooth. A person who works on decK actually changed the product so that we could have users just copy and paste down the page.”</em></p>

<p>— Fabian Rodriguez</p>

<p>When docs requirements drive product changes, the product becomes more user-friendly by design.</p>

<h2 id="results-catching-issues-before-users-do">Results: Catching Issues Before Users Do</h2>

<p>Kong’s doc testing has delivered measurable improvements across several dimensions.</p>

<h3 id="catching-third-party-breaking-changes">Catching Third-Party Breaking Changes</h3>

<p>Kong’s products integrate with numerous third-party services, and those services change without notice. The doc tests caught a breaking change when Keycloak modified how their Docker container runs, a change that would have broken Kong’s authentication integration guides for users.</p>

<p><em>“Out of the blue they changed the way you run the Docker container. We actually noticed that because of the tests, which was really cool.”</em></p>

<p>— Fabian Rodriguez</p>

<h3 id="part-of-the-product-release-process">Part of the Product Release Process</h3>

<p>Kong’s doc test suite has become an official part of their product release process. The team can run tests against pre-release versions of Kong products, catching breaking changes before they reach users.</p>

<p>When Kong launched Event Gateway, a new product, the doc tests were ready from day one. During the week before general availability, as the engineering team made last-minute API changes, the doc tests caught issues in near real-time.</p>

<p><em>“We were able to catch a lot of stuff because of the tests. They made a change to the API, they made a change to this other thing. We were able to catch those because of the tests. Otherwise we would have to spend a lot of time testing things manually.”</em></p>

<p>— Fabian Rodriguez</p>

<h3 id="doc-tests-that-compliment-engineering-tests">Doc Tests That Compliment Engineering Tests</h3>

<p>Perhaps the most striking validation came from Kong’s engineering teams. Doc tests that simulate real user workflows often catch issues that traditional unit and integration tests miss.</p>

<p>This makes sense when you consider what doc tests actually validate. While engineering tests verify that individual pieces of functionality work correctly, doc tests verify that end-to-end user workflows succeed, which is ultimately what matters for user experience.</p>

<h2 id="the-writers-experience">The Writers’ Experience</h2>

<p>Adopting this approach required writers to learn new skills, particularly working with YAML syntax, but the benefits quickly became apparent.</p>

<p><em>“It was a bit of a learning curve to do the YAML, but it’s so nice because I remember pasting in a curl example and then fighting with the formatting. With the YAML you don’t have to fight the formatting at all. It also forces us to test everything. As I’m writing it, I’m also testing everything.”</em></p>

<p>— Diana Breza</p>

<p>The testing workflow also changed how writers interact with their product teams. When writers discover issues during docs development, they have immediate evidence and reproducible test cases to share.</p>

<p><em>“Our writers are a lot more active in project channels and team channels saying, ‘Hey, this is broken.’ Sometimes it’s like, ‘Oh, you’re right. I’ll file a bug for it.’”</em></p>

<p>— Diana Breza</p>

<p>This shift positions technical writers as quality partners rather than downstream dependencies for product changes.</p>

<h2 id="ai-is-why-accuracy-matters-more-than-ever">AI is Why Accuracy Matters More Than Ever</h2>

<p>The 91% confident answer rate from Kong’s AI chatbot isn’t a coincidence. When docs are accurate, complete, and structured consistently, AI systems can retrieve and synthesize information more effectively.</p>

<p>This creates a virtuous cycle: doc testing guarantees accuracy, accurate docs enable confident AI responses, and confident AI responses reduce support burden and improve user satisfaction.</p>

<p>As organizations increasingly rely on AI-powered tools that consume docs, the importance of docs accuracy multiplies. A single incorrect procedure doesn’t just frustrate one user who reads it; it propagates through every AI-generated response that draws from that source.</p>

<h2 id="what-we-can-learn-from-kong">What We Can Learn From Kong</h2>

<p>Kong’s experience shares several insights for teams considering doc testing:</p>

<ul>
  <li>
    <p><strong>Design for testability from the start.</strong> Kong’s copy-paste approach creates better user experiences AND makes testing straightforward.</p>
  </li>
  <li>
    <p><strong>Derive tests from docs, not parallel artifacts.</strong> When tests come from the same source as docs, they can’t drift apart.</p>
  </li>
  <li>
    <p><strong>Doc testing can improve products.</strong> When docs requirements influence product design, everyone benefits.</p>
  </li>
  <li>
    <p><strong>End-to-end workflow tests catch what unit tests miss.</strong> Doc tests validate the actual user journey, not just individual components.</p>
  </li>
  <li>
    <p><strong>AI accuracy depends on docs accuracy.</strong> As AI consumes your docs, testing becomes even more critical.</p>
  </li>
</ul>

<h2 id="getting-started-with-docs-as-tests">Getting Started with Docs as Tests</h2>

<p>You don’t need to build custom tooling to start testing your docs. The Docs as Tests approach works with a variety of tools, from purpose-built solutions like <a href="https://doc-detective.com">Doc Detective</a> to general-purpose testing frameworks like Playwright or Cypress adapted for docs workflows.</p>

<p>It isn’t about which tool to use. It’s about treating docs as testable assertions about product behavior. When you do, you can verify accuracy automatically, catch regressions proactively, and build confidence that what you’ve written actually works.</p>

<p>Start small. Pick one high-value procedure, like your getting started guide or most-viewed how-to, and make it testable. Learn what works for your content, your products, and your team. Then expand from there.</p>

<p>Your users, and your AI chatbot, will thank you.</p>

<hr />

<p><em>This case study is based on an interview with Diana Breza and Fabian Rodriguez of Kong. Diana presented Kong’s doc testing approach at Write the Docs Berlin.</em></p>

<p><em>Learn more about Docs as Tests at <a href="https://docsastests.com">docsastests.com</a> and explore Doc Detective at <a href="https://doc-detective.com">doc-detective.com</a>.</em></p>]]></content><author><name>Manny Silva</name></author><category term="docs-as-tests" /><summary type="html"><![CDATA[Kong’s documentation team fundamentally changed how their docs relate to their product. After rebuilding their CLI how-to guides to be testable, their AI-powered documentation chatbot accurately answered 91% of user questions with confidence, up from 84%. That 7% improvement wasn’t the result of better AI models or more sophisticated prompt engineering—it came from making sure every how-to guide on their site actually works, every time.]]></summary><media:thumbnail xmlns:media="http://search.yahoo.com/mrss/" url="https://www.docsastests.com/images/kong-case-study.webp" /><media:content medium="image" url="https://www.docsastests.com/images/kong-case-study.webp" xmlns:media="http://search.yahoo.com/mrss/" /></entry><entry><title type="html">Docs as Tests book is Now Available!</title><link href="https://www.docsastests.com/docs-as-tests-resilient-book/" rel="alternate" type="text/html" title="Docs as Tests book is Now Available!" /><published>2025-05-04T00:00:00+00:00</published><updated>2025-05-04T00:00:00+00:00</updated><id>https://www.docsastests.com/docs-as-tests-book</id><content type="html" xml:base="https://www.docsastests.com/docs-as-tests-resilient-book/"><![CDATA[<h1 id="docs-as-tests-book-is-now-available">Docs as Tests book is Now Available!</h1>

<p>I’m thrilled to announce that my book, “Docs as Tests: A Strategy for Resilient Technical Documentation” is now available! After years of developing this approach at companies like Skyflow and sharing it with the documentation community, I’ve created a comprehensive guide to help technical writers and developers keep documentation accurate and in sync with products.</p>

<p><a href="https://amzn.to/3NEqwAV">Get your copy today!</a></p>

<h2 id="what-youll-learn">What You’ll Learn</h2>

<p><em>Docs as Tests</em> introduces a powerful strategy that treats documentation as testable assertions about how your product works. By implementing automated testing for your documentation, you can:</p>

<ul>
  <li>Catch documentation issues before your users do</li>
  <li>Maintain accurate screenshots, API examples, and code snippets</li>
  <li>Build user trust through consistently reliable documentation</li>
  <li>Reduce support costs and improve user experience</li>
</ul>

<p>The book covers testing approaches for all major product interfaces:</p>
<ul>
  <li>GUIs (web and native applications)</li>
  <li>APIs (REST, GraphQL, AsyncAPI)</li>
  <li>Command-line interfaces</li>
  <li>Code examples and SDK documentation</li>
</ul>

<h2 id="watch-the-launch-event">Watch the Launch Event</h2>

<p>Missed the book launch event? You can <a href="https://boffin.education/docs-as-tests-book-launch/">watch the panel</a> to hear insights from experts who’ve implemented Docs as Tests in their organizations.</p>

<h2 id="interested-in-a-docs-as-tests-course">Interested in a Docs as Tests Course?</h2>

<p>Based on the enthusiastic response to the book, I’m considering developing a hands-on course that will walk you through implementing Docs as Tests in your organization. If you’re interested, please <a href="https://boffin.education/docs-as-tests-book-launch/">fill out this form</a> to help gauge interest and shape the content.</p>

<h2 id="get-your-copy-today">Get Your Copy Today</h2>

<p>Whether you’re a technical writer, developer, documentation manager, or anyone else involved in creating technical documentation, “Docs as Tests” will help you build more resilient, trustworthy docs.</p>

<p>Ready to transform your documentation strategy? <a href="https://amzn.to/3NEqwAV">Get your copy today!</a></p>]]></content><author><name>Manny Silva</name></author><category term="docs-as-tests" /><category term="announcement" /><summary type="html"><![CDATA[Docs as Tests book is Now Available!]]></summary><media:thumbnail xmlns:media="http://search.yahoo.com/mrss/" url="https://www.docsastests.com/images/docs-as-tests-book.png" /><media:content medium="image" url="https://www.docsastests.com/images/docs-as-tests-book.png" xmlns:media="http://search.yahoo.com/mrss/" /></entry><entry><title type="html">Add Docs as Tests to Your CI/CD Pipeline with GitHub Actions</title><link href="https://www.docsastests.com/ci-with-github-actions" rel="alternate" type="text/html" title="Add Docs as Tests to Your CI/CD Pipeline with GitHub Actions" /><published>2024-08-10T00:00:00+00:00</published><updated>2024-08-10T00:00:00+00:00</updated><id>https://www.docsastests.com/ci-with-github-actions</id><content type="html" xml:base="https://www.docsastests.com/ci-with-github-actions"><![CDATA[<blockquote>
  <p>August 10, 2024: Updated the tutorial to use the <a href="https://github.com/marketplace/actions/doc-detective">Doc Detective GitHub Action</a>.</p>
</blockquote>

<p>Adding Doc Detective into a CI/CD pipeline to run tests whenever changes occur in a repository is easy and gives you a flexible and powerful tech doc toolchain. In this guide, we’ll walk through setting up a basic Docs as Code pipeline using the venerable Jekyll static site generator, set up some simple doc detective tests, and put together scripts for a CI/CD pipeline using Github Actions to demonstrate how to automatically test your docs off of each update.</p>

<h2 id="prerequisites">Prerequisites</h2>

<p>This tutorial is written for Unix-based systems. If you’re using Windows, most of what we’re covering regarding GitHub Actions should still apply, but you may need to use different commands to get Jekyll up and running.</p>

<p>This tutorial is mostly focused on setting up Doc Detective in CI/CD, so we’re going to assume you have a few things already set up:</p>

<ul>
  <li>A GitHub account</li>
  <li><a href="https://www.ruby-lang.org/en/documentation/installation/">Ruby installed as outlined</a></li>
  <li><a href="https://jekyllrb.com/docs/installation/">Jekyll installed as a Ruby Gem</a></li>
  <li><a href="https://bundler.io/">Bundler installed as a Ruby Gem</a></li>
</ul>

<h2 id="the-lazy-way">The Lazy Way</h2>

<p>If you don’t want to go through all of the following steps, you can fork the <a href="https://github.com/nikomancy/doc-detective-ci-cd/tree/starting-point">doc-detective-ci-cd starting point branch</a>. This branch contains the files and code you would get from following the instructions in this post.</p>

<p>Download the contents of the branch, add them to your own repository’s <code class="language-plaintext highlighter-rouge">gh-pages</code> branch, and push them to origin.</p>

<div class="language-sh highlighter-rouge"><div class="highlight"><pre class="highlight"><code>git clone <span class="nt">--branch</span> gh-pages https://github.com/nikomancy/doc-detective-ci-cd.git
</code></pre></div></div>

<h2 id="setting-up-jekyll">Setting up Jekyll</h2>

<p>Let’s sprint through setting a Jekyll site up with GitHub Pages. (If you want to see a full tutorial on setting up a Jekyll site, <a href="https://docs.github.com/en/pages/setting-up-a-github-pages-site-with-jekyll/creating-a-github-pages-site-with-jekyll">Github has an excellent one</a>)</p>

<ol>
  <li>Create a new repository on GitHub. You can name it whatever you want, but for this tutorial, we’ll call it <code class="language-plaintext highlighter-rouge">doc-detective-ci-cd</code>.</li>
  <li>Clone the repository to your local machine.</li>
  <li>Open the directory in your terminal and checkout a new branch that we’ll call <code class="language-plaintext highlighter-rouge">gh-pages</code> by using <code class="language-plaintext highlighter-rouge">git checkout --orphan gh-pages</code>.</li>
  <li>Jekyll only generates the files for a new site in an empty directory, so delete all the files in the directory and run the following command:</li>
</ol>

<div class="language-bash highlighter-rouge"><div class="highlight"><pre class="highlight"><code>jekyll new <span class="nt">--skip-bundle</span> <span class="nb">.</span>
</code></pre></div></div>

<p>This creates a new Jekyll site in the current directory. The <code class="language-plaintext highlighter-rouge">--skip-bundle</code> flag tells Jekyll to skip installing the dependencies, as we’ll be using Bundler to manage them.</p>

<p>In the root of your newly scaffolded Jekyll site, find and open your Gemfile, then comment out the line that starts with <code class="language-plaintext highlighter-rouge">gem "jekyll",</code></p>

<p>Next, uncomment the line that starts with <code class="language-plaintext highlighter-rouge">gem "github-pages",</code> and save the file.</p>

<p>Edit that line to include the current version of GitHub Pages. You can find the current version by visiting the <a href="https://pages.github.com/versions/">GitHub Pages Dependency Versions</a> page.</p>

<div class="language-ruby highlighter-rouge"><div class="highlight"><pre class="highlight"><code><span class="n">gem</span> <span class="s2">"github-pages"</span><span class="p">,</span> <span class="s2">"~&gt; GITHUB-PAGES-VERSION"</span><span class="p">,</span> <span class="ss">group: :jekyll_plugins</span>
</code></pre></div></div>

<p>Save the file and close it.</p>

<p>Now, open the <code class="language-plaintext highlighter-rouge">_config.yml</code> file and change the <code class="language-plaintext highlighter-rouge">url</code> and <code class="language-plaintext highlighter-rouge">baseurl</code> to match your repository name. For example, if your repository is called <code class="language-plaintext highlighter-rouge">doc-detective-ci-cd</code>, you would change the <code class="language-plaintext highlighter-rouge">url</code> and <code class="language-plaintext highlighter-rouge">baseurl</code> to:</p>

<div class="language-yaml highlighter-rouge"><div class="highlight"><pre class="highlight"><code><span class="na">baseurl</span><span class="pi">:</span> <span class="s2">"</span><span class="s">/doc-detective-ci-cd/"</span> <span class="c1"># the subpath of your site, e.g. /blog</span>
<span class="na">url</span><span class="pi">:</span> <span class="s2">"</span><span class="s">http://&lt;your</span><span class="nv"> </span><span class="s">username&gt;.github.io"</span> <span class="c1"># the base hostname &amp; protocol for your site</span>
</code></pre></div></div>

<p>Close the file and save it.</p>

<p>Finally, run the following command in your terminal:</p>

<div class="language-bash highlighter-rouge"><div class="highlight"><pre class="highlight"><code>bundle add webrick
bundle <span class="nb">install</span>
</code></pre></div></div>

<p>This will add the missing webrick dependency to your gemfile and install the dependencies for your Jekyll site.</p>

<p>Save and commit the changes from this section to your repository then push this branch back to origin with <code class="language-plaintext highlighter-rouge">git push origin gh-pages</code>.</p>

<h2 id="setting-up-github-pages">Setting up GitHub pages</h2>

<p>Since Github automatically looks for a <code class="language-plaintext highlighter-rouge">gh-pages</code> branch in your repository, you don’t need to do anything else to set up GitHub Pages. You can now visit <code class="language-plaintext highlighter-rouge">https://&lt;your-github-username&gt;.github.io/&lt;your-repository-name&gt;</code> to see your site.</p>

<h2 id="adding-content-to-your-site">Adding content to your site</h2>

<p>You can add content to your site by adding markdown files to the <code class="language-plaintext highlighter-rouge">_posts</code> directory. In this case, we’re going to add a Markdown file that contains inline Doc Detective tests.</p>

<p>Create a new file in the <code class="language-plaintext highlighter-rouge">_posts</code> directory called <code class="language-plaintext highlighter-rouge">2024-02-16-reqres-docs.md</code>, and add the following content:</p>

<div class="language-markdown highlighter-rouge"><div class="highlight"><pre class="highlight"><code><span class="nn">---</span>
<span class="na">layout</span><span class="pi">:</span> <span class="s">post</span>
<span class="na">title</span><span class="pi">:</span>  <span class="s2">"</span><span class="s">Reqres</span><span class="nv"> </span><span class="s">API"</span>
<span class="nn">---</span>

<span class="gu">## Resource Endpoint</span>
If you execute this command in your terminal:

<span class="p">[</span><span class="ss">comment</span><span class="p">]:</span> <span class="sx">#</span> <span class="nn">(test start {"id": "Test 1", "description": "Test if the endpoint is working at all."})</span><span class="sb">

    ```sh
    curl -X 'GET' \
      'https://reqres.in/api/{resource}' \
      -H 'accept: application/json'
    ```

</span><span class="p">[</span><span class="ss">comment</span><span class="p">]:</span> <span class="sx">#</span> <span class="nn">(step {"action": "httpRequest", "url": "https://reqres.in/api/{resource}"})</span>

The API will return a list of resources.

<span class="p">[</span><span class="ss">comment</span><span class="p">]:</span> <span class="sx">#</span> <span class="nn">(test end)</span>

<span class="gu">## Creating Users</span>
If you execute this command in your terminal:

<span class="p">[</span><span class="ss">comment</span><span class="p">]:</span> <span class="sx">#</span> <span class="nn">(test start {"id": "Test 2", "description": "Test the user creation endpoint"})</span><span class="sb">

    ```sh
    curl --request POST \
      --url https://reqres.in/api/users \
      --header 'Content-Type: application/json' \
      --header 'accept: application/json' \
      --data '{
    "name": "Doc Brown",
    "job": "Test master"
    }'
    ```

</span><span class="p">[</span><span class="ss">comment</span><span class="p">]:</span> <span class="sx">#</span> <span class="nn">(step { "action": "httpRequest", "url": "https://reqres.in/api/users", "method": "post", "requestData": { "name": "Doc Brow", "job": "Test master" }, "responseData": { "name": "Doc Brown" }, "statusCodes": [200, 201] })</span>

The API will return confirmation that the request created a new user and will list the fields on that user.

<span class="p">[</span><span class="ss">comment</span><span class="p">]:</span> <span class="sx">#</span> <span class="nn">(test end)</span>
</code></pre></div></div>

<p>Now, save and commit the changes to your repository and push them to the <code class="language-plaintext highlighter-rouge">gh-pages</code> branch.</p>

<h2 id="setting-up-github-actions">Setting up GitHub Actions</h2>

<p>Now that we have a Jekyll site set up and hosted on GitHub Pages, we can set up the <a href="https://github.com/marketplace/actions/doc-detective">Doc Detective GitHub Action</a> to run the tests whenever we push new content to the <code class="language-plaintext highlighter-rouge">gh-pages</code> branch.</p>

<p>Create a new file in the <code class="language-plaintext highlighter-rouge">.github/workflows</code> directory called <code class="language-plaintext highlighter-rouge">docs-as-tests.yml</code>, and add the following content:</p>

<div class="language-yaml highlighter-rouge"><div class="highlight"><pre class="highlight"><code><span class="na">name</span><span class="pi">:</span> <span class="s">Docs as Tests</span>
</code></pre></div></div>

<p>Next, let’s add a trigger to the workflow that prompts the action to run whenever we push new content to the <code class="language-plaintext highlighter-rouge">gh-pages</code> branch.</p>

<div class="language-yaml highlighter-rouge"><div class="highlight"><pre class="highlight"><code><span class="na">on</span><span class="pi">:</span>
  <span class="na">push</span><span class="pi">:</span>
    <span class="na">branches</span><span class="pi">:</span>
      <span class="pi">-</span> <span class="s">gh-pages</span>
</code></pre></div></div>

<p>Now, let’s add a job to the workflow that runs the tests. Github Actions run on a fresh virtual machine each time they’re triggered, so we need to check out the repository with our changes.</p>

<div class="language-yaml highlighter-rouge"><div class="highlight"><pre class="highlight"><code><span class="na">jobs</span><span class="pi">:</span>
  <span class="na">run-tests</span><span class="pi">:</span>
    <span class="na">steps</span><span class="pi">:</span>

    <span class="pi">-</span> <span class="na">name</span><span class="pi">:</span> <span class="s">Checkout doc-detective-ci-cd repository</span>
      <span class="na">uses</span><span class="pi">:</span> <span class="s">actions/checkout@v4</span>
</code></pre></div></div>

<p>Finally, we can run the tests by running Doc Detective and passing the path to the <code class="language-plaintext highlighter-rouge">_posts</code> directory in the repository we’re running the tests on. We’ll also set <code class="language-plaintext highlighter-rouge">exit_on_fail</code> to <code class="language-plaintext highlighter-rouge">true</code> to throw an error if there are any failed tests.</p>

<div class="language-yaml highlighter-rouge"><div class="highlight"><pre class="highlight"><code>    <span class="pi">-</span> <span class="na">name</span><span class="pi">:</span> <span class="s">Run Doc Detective tests</span>
      <span class="na">uses</span><span class="pi">:</span> <span class="s">doc-detective/github-action@v1</span>
      <span class="na">with</span><span class="pi">:</span>
        <span class="na">input</span><span class="pi">:</span> <span class="s">_posts/</span>
        <span class="na">exit_on_fail</span><span class="pi">:</span> <span class="kc">true</span>
</code></pre></div></div>

<p>Putting the entire workflow together, we get the following:</p>

<div class="language-yaml highlighter-rouge"><div class="highlight"><pre class="highlight"><code><span class="na">name</span><span class="pi">:</span> <span class="s">Docs as Tests</span>

<span class="na">on</span><span class="pi">:</span>
  <span class="na">push</span><span class="pi">:</span>
    <span class="na">branches</span><span class="pi">:</span>
      <span class="pi">-</span> <span class="s">gh-pages</span>

<span class="na">jobs</span><span class="pi">:</span>
  <span class="na">run-tests</span><span class="pi">:</span>
    <span class="na">runs-on</span><span class="pi">:</span> <span class="s">ubuntu-latest</span>
    <span class="na">steps</span><span class="pi">:</span>

    <span class="pi">-</span> <span class="na">name</span><span class="pi">:</span> <span class="s">Checkout doc-detective-ci-cd repository</span>
      <span class="na">uses</span><span class="pi">:</span> <span class="s">actions/checkout@v4</span>

    <span class="pi">-</span> <span class="na">name</span><span class="pi">:</span> <span class="s">Run Doc Detective tests</span>
      <span class="na">uses</span><span class="pi">:</span> <span class="s">doc-detective/github-action@v1</span>
      <span class="na">with</span><span class="pi">:</span>
        <span class="na">input</span><span class="pi">:</span> <span class="s">_posts/</span>
        <span class="na">exit-_on_fail</span><span class="pi">:</span> <span class="kc">true</span>
</code></pre></div></div>

<p>Save and commit the changes to your repository and push them to the <code class="language-plaintext highlighter-rouge">gh-pages</code> branch. Now, whenever you push new content to the <code class="language-plaintext highlighter-rouge">gh-pages</code> branch, the tests will run and you will be able to see the results in the Actions tab of your repository.</p>

<p>There’s a failing test in the markdown test earlier in this post. The Github action should be failing and will provide some additional details to help with fixing it. In this case, it’s just a typo in a test. But, if the service the tests rely on breaks, you will get the same error.</p>

<h2 id="conclusion">Conclusion</h2>

<p>In this tutorial, we set up a Jekyll site with GitHub Pages, added content to the site, and set up a GitHub Action to run Doc Detective tests on the content whenever we push new content to the <code class="language-plaintext highlighter-rouge">gh-pages</code> branch. Now, as your product evolves, you can be confident that changes that break the test will come to your attention immediately.</p>

<hr />

<h2 id="about-the-tool">About the tool</h2>

<p><a href="https://doc-detective.com">Doc Detective</a> is an open-source documentation testing framework. Doc Detective has multiple components to integrate with your workflows as you need it to:</p>

<ul>
  <li><a href="https://github.com/doc-detective/doc-detective">Doc Detective</a>: A standalone tool to test docs against product UIs and APIs.</li>
  <li><a href="https://github.com/doc-detective/doc-detective-companion">Doc Detective Companion</a>: A browser extension for <a href="https://chrome.google.com/webstore/detail/doc-detective-companion/dfpbndchffmilddiaccdcpoejljlaghm">Chrome</a> and <a href="https://addons.mozilla.org/en-US/firefox/addon/doc-detective-companion">Firefox</a> to help you build tests and find CSS selectors.</li>
  <li><a href="https://github.com/doc-detective/doc-detective-core">Doc Detective Core</a>: An NPM package that provides Doc Detective’s testing functionality.</li>
</ul>

<p>Doc Detective is open to contributions, and you can join the chat on <a href="https://discord.com/invite/sgnE22uZ9w">Discord</a>. If you like what you see, you can ⭐ star the repositories on GitHub or ❤️ sponsor development via <a href="https://opencollective.com/doc-detective">Open Collective</a> or <a href="https://github.com/sponsors/doc-detective">GitHub Sponsors</a>.</p>

<hr />

<p>Thanks for reading. If you like what you read here, <a href="http://eepurl.com/iHb1CE">sign up for the newsletter</a> to stay up to date on Docs as Tests discussions, share this article with those you think would appreciate it, or sound off in the comments below.</p>]]></content><author><name>Niko Berry</name></author><category term="tutorial" /><category term="ci" /><category term="cd" /><category term="github" /><category term="github-actions" /><category term="doc-detective" /><summary type="html"><![CDATA[August 10, 2024: Updated the tutorial to use the Doc Detective GitHub Action.]]></summary><media:thumbnail xmlns:media="http://search.yahoo.com/mrss/" url="https://www.docsastests.com/images/ci-with-github-actions.webp" /><media:content medium="image" url="https://www.docsastests.com/images/ci-with-github-actions.webp" xmlns:media="http://search.yahoo.com/mrss/" /></entry><entry><title type="html">Validate README Commands with Innovation Engine</title><link href="https://www.docsastests.com/validate-commands-with-innovation-engine" rel="alternate" type="text/html" title="Validate README Commands with Innovation Engine" /><published>2024-07-05T00:00:00+00:00</published><updated>2024-07-05T00:00:00+00:00</updated><id>https://www.docsastests.com/validate-commands-with-innovation-engine</id><content type="html" xml:base="https://www.docsastests.com/validate-commands-with-innovation-engine"><![CDATA[<p>Maintaining accurate and reliable CLI-based documentation is critical, especially when it comes to installation instructions and READMEs.</p>

<p>Azure’s Innovation Engine, <a href="https://youtu.be/6eNLouO0LcA?si=vvAYCMAPo7yRMD3C" target="_blank">introduced at the Linux Foundation Open Source Summit North America 2024</a>, transforms Markdown into executable scripts, enabling interactive tutorials, automated tests, response validation, and execution of CLI commands. While Innovation Engine is still in the early stages of development, it shows promise for improving the quality and accuracy of CLI-based docs.</p>

<p>Here, we’ll cover how to use Innovation Engine to test all the <code class="language-plaintext highlighter-rouge">bash</code> commands in code blocks within a tutorial written in Markdown. We’ll use a simple tutorial that interacts with the ReqRes API, a fake online REST API designed for testing and prototyping. One item to note, though: Innovation Engine is <code class="language-plaintext highlighter-rouge">bash</code>-only at the moment, so you’ll need a macOS or Linux environment (<a href="https://learn.microsoft.com/en-us/windows/wsl/" target="_blank">Windows Subsystem for Linux (WSL)</a> on Windows works great) to follow along.</p>

<h2 id="prerequisites">Prerequisites</h2>

<p>This tutorial is <em>slightly</em> more advanced than other recent ones. Let’s make sure you’re ready to go. You need</p>

<ul>
  <li>A <code class="language-plaintext highlighter-rouge">bash</code> shell.</li>
  <li><a href="https://go.dev/doc/install" target="_blank">Go</a> installed on your machine.</li>
</ul>

<h2 id="set-up-innovation-engine">Set up Innovation Engine</h2>

<p>To install and build Innovation Engine, you need to download or build the <code class="language-plaintext highlighter-rouge">ie</code> binary.</p>

<p>On Linux, you can download the binary and make it executable with the following commands:</p>

<div class="language-bash highlighter-rouge"><div class="highlight"><pre class="highlight"><code><span class="nv">VERSION</span><span class="o">=</span><span class="s2">"latest"</span>
wget <span class="nt">-q</span> <span class="nt">-O</span> ie https://github.com/Azure/InnovationEngine/releases/download/<span class="nv">$VERSION</span>/ie
<span class="nb">chmod</span> +x ie
</code></pre></div></div>

<p>On macOS (or if you like to go the hard road on Linux), you need to clone the repo and run the build command:</p>

<div class="language-bash highlighter-rouge"><div class="highlight"><pre class="highlight"><code>git clone https://github.com/Azure/InnovationEngine<span class="p">;</span>
<span class="nb">cd </span>InnovationEngine<span class="p">;</span>
make build-ie<span class="p">;</span>
<span class="nb">cd</span> ./bin
</code></pre></div></div>

<h2 id="sample-document-and-formatting">Sample document and formatting</h2>

<p>Here’s a <a href="/assets/reqres_tutorial.md" target="_blank">simple tutorial</a> in Markdown that uses ReqRes, a testing API that uses fake data. The tutorial focuses on two common API requests: fetching a list of users and creating a new user.</p>

<p>Each command is in a bash code block, and the expected output is in a JSON code block below it. By default, Innovation Engine runs commands in bash code blocks to make sure they run as expected. For example:</p>

<div class="language-markdown highlighter-rouge"><div class="highlight"><pre class="highlight"><code>    <span class="p">```</span><span class="nl">bash
</span>    curl <span class="nt">-X</span> POST https://reqres.in/api/users <span class="se">\</span>
      <span class="nt">-H</span> <span class="s2">"Content-Type: application/json"</span> <span class="se">\</span>
      <span class="nt">-d</span> <span class="s1">'{
        "name": "Jane Doe",
        "job": "Developer"
      }'</span>
    <span class="p">```</span>
</code></pre></div></div>

<p>To validate responses, you need to add an HTML-style comment before the immediately following code block and include the <code class="language-plaintext highlighter-rouge">expected_similarity</code> key and a value between 0 and 1. This value represents the similarity between the expected output and the actual output, allowing for fuzzy matching.</p>

<div class="language-markdown highlighter-rouge"><div class="highlight"><pre class="highlight"><code>    <span class="c">&lt;!--expected_similarity=0.8--&gt;</span>
    <span class="p">```</span><span class="nl">
</span>    {"name":"Jane Doe","job":"Developer","id":"557","createdAt":"2024-07-04T21:58:42.684Z"}
    <span class="p">```</span>
</code></pre></div></div>

<p><strong>Note:</strong> Response code blocks can’t have language tags, so you can’t use <code class="language-plaintext highlighter-rouge">json</code> or <code class="language-plaintext highlighter-rouge">bash</code> here. If there’s a language tag, Innovation Engine won’t consider it a response block.</p>

<h2 id="testing-the-commands">Testing the commands</h2>

<p>Using Innovation Engine, we can test the commands in the code blocks to make sure they run correctly.</p>

<ol>
  <li>Download <a href="/assets/reqres_tutorial.md" download="reqres_tutorial.md">reqres_tutorial.md</a> into the same directory at the <code class="language-plaintext highlighter-rouge">ie</code> binary.</li>
  <li>
    <p>Run the following command to test the commands in the tutorial:</p>

    <div class="language-bash highlighter-rouge"><div class="highlight"><pre class="highlight"><code> ./ie <span class="nb">test </span>reqres_tutorial.md
</code></pre></div>    </div>

    <p>This command reads the Markdown file, executes the <code class="language-plaintext highlighter-rouge">curl</code> commands, and validates the output.</p>

    <p>The output should look similar to this:</p>

    <div class="language-plaintext highlighter-rouge"><div class="highlight"><pre class="highlight"><code> $ ./ie test reqres_tutorial.md
 bash:$ curl https://reqres.in/api/users

 {"page":1,"per_page":6,"total":12,"total_pages":2,"data":[{"id":1,"email":"george.bluth@reqres.in","first_name":"George","last_name":"Bluth","avatar":"https://reqres.in/img/faces/1-image.jpg"},{"id":2,"email":"janet.weaver@reqres.in","first_name":"Janet","last_name":"Weaver","avatar":"https://reqres.in/img/faces/2-image.jpg"},{"id":3,"email":"emma.wong@reqres.in","first_name":"Emma","last_name":"Wong","avatar":"https://reqres.in/img/faces/3-image.jpg"},{"id":4,"email":"eve.holt@reqres.in","first_name":"Eve","last_name":"Holt","avatar":"https://reqres.in/img/faces/4-image.jpg"},{"id":5,"email":"charles.morris@reqres.in","first_name":"Charles","last_name":"Morris","avatar":"https://reqres.in/img/faces/5-image.jpg"},{"id":6,"email":"tracey.ramos@reqres.in","first_name":"Tracey","last_name":"Ramos","avatar":"https://reqres.in/img/faces/6-image.jpg"}],"support":{"url":"https://reqres.in/#support-heading","text":"To keep ReqRes free, contributions towards server costs are appreciated!"}}
 bash:$ curl -X POST https://reqres.in/api/users \
   -H "Content-Type: application/json" \
   -d '{
     "name": "Jane Doe",
     "job": "Developer"
   }'

 {"name":"Jane Doe","job":"Developer","id":"334","createdAt":"2024-07-04T22:17:31.936Z"}
</code></pre></div>    </div>

    <p>The output shows the commands being executed and the expected output. If the actual output matches the expected output within the similarity threshold, the test passes. If the output isn’t similar enough to the expected output, the test fails.</p>
  </li>
</ol>

<h2 id="wrapping-up">Wrapping up</h2>

<p>By validating your documentation with Innovation Engine, you can make sure that your code examples are always accurate and functional. While Innovation Engine is limited to testing CLI docs, it can be integrated into your CI/CD pipeline to automate your testing and make sure that your most important CLI-based docs, like installation instructions, are always up-to-date and accurate.</p>

<hr />

<h2 id="about-the-tool">About the tool</h2>

<p>Azure’s Innovation Engine is a CLI tool that transforms markdown documentation into executable scripts. This allows for interactive tutorials, automated tests, and execution of CLI commands, making sure your documentation remains accurate and up-to-date. For more information, see the <a href="https://github.com/Azure/InnovationEngine">Innovation Engine GitHub repository</a>.</p>

<hr />

<p>Thanks for reading. If you like what you read here, <a href="http://eepurl.com/iHb1CE">sign up for the newsletter</a> to stay up to date on Docs as Tests discussions, share this article with those you think would appreciate it, or sound off in the comments below.</p>]]></content><author><name>Manny Silva</name></author><category term="tutorial" /><category term="cli" /><category term="bash" /><category term="code-blocks" /><category term="innovation-engine" /><category term="microsoft" /><category term="azure" /><summary type="html"><![CDATA[Maintaining accurate and reliable CLI-based documentation is critical, especially when it comes to installation instructions and READMEs.]]></summary><media:thumbnail xmlns:media="http://search.yahoo.com/mrss/" url="https://www.docsastests.com/images/validate-cli-innovation-engine.png" /><media:content medium="image" url="https://www.docsastests.com/images/validate-cli-innovation-engine.png" xmlns:media="http://search.yahoo.com/mrss/" /></entry><entry><title type="html">Validate a UI with Cypress</title><link href="https://www.docsastests.com/validate-ui-with-cypress" rel="alternate" type="text/html" title="Validate a UI with Cypress" /><published>2024-03-04T00:00:00+00:00</published><updated>2024-03-04T00:00:00+00:00</updated><id>https://www.docsastests.com/validate-ui-with-cypress</id><content type="html" xml:base="https://www.docsastests.com/validate-ui-with-cypress"><![CDATA[<p>Docs as Tests is a strategy for using docs to test a product, validating both that the docs are accurate and that the product is functioning as expected. That’s a great aspiration, but what does it look like in practice?</p>

<p>Today, I’ll show you how to validate a UI-based procedure with <a href="https://cypress.io">Cypress</a>—an engineering-focused testing tool—to make sure that it works as expected. Cypress tests are written in JavaScript or TypeScript and use JavaScript-style test assertions, so if you’re comfortable with those, you’re good to go. If not, don’t worry! We’ll walk through the basics of writing a Cypress test to validate our procedure, and I’ll show you how to run the test in the Cypress Test Runner and from the command line.</p>

<h2 id="considerations">Considerations</h2>

<p>Before we get started, there are a few things to consider when using Cypress for Docs as Tests:</p>

<ul>
  <li><strong>Cypress is a UI testing tool.</strong> It’s great for validating UI-based procedures, but it’s not great for validating non-UI-based procedures. For example, you can’t use Cypress to validate a command-line procedure without extensions.</li>
  <li><strong>Cypress tests are written in JavaScript or TypeScript.</strong> If you’re not comfortable with JavaScript or TypeScript, you might find it difficult to write and maintain Cypress tests.</li>
  <li><strong>Cypress tests are separate from your content.</strong> You can’t embed Cypress tests in your content, so you have to maintain them separately. This can make it difficult to keep your tests in sync with your content, especially if you’re iterating on your content frequently.</li>
</ul>

<p>With these considerations in mind, let’s get started!</p>

<h2 id="the-setup">The setup</h2>

<p>
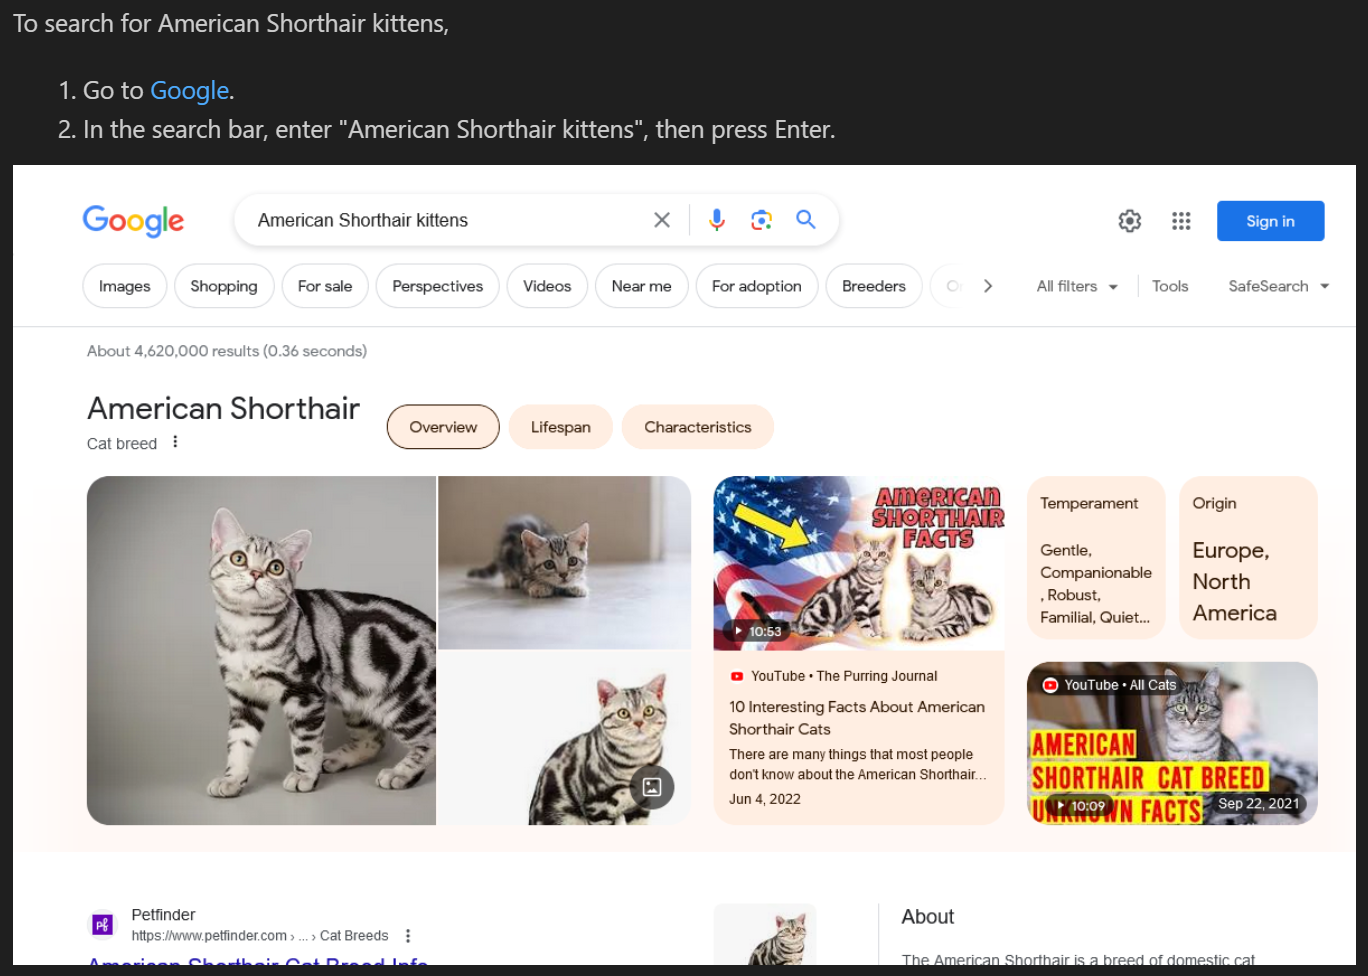
For this tutorial, assume you have a simple procedure about searching for American Shorthair kittens:</p>

<div class="language-markdown highlighter-rouge"><div class="highlight"><pre class="highlight"><code>To search for American Shorthair kittens,
<span class="p">
1.</span> Go to <span class="p">[</span><span class="nv">Google</span><span class="p">](</span><span class="sx">https://www.google.com</span><span class="p">)</span>.
<span class="p">2.</span> In the search bar, enter "American Shorthair kittens", then press Enter.

<span class="p">![</span><span class="nv">Search results</span><span class="p">](</span><span class="sx">search-results.png</span><span class="p">)</span>
</code></pre></div></div>

<p>We’ll call this <em>kitten-search.md</em>. Here’s a rendered preview:</p>

<p><img src="/images/validate-ui-doc-detective-before.png" alt="Rendered preview of kitten-search.md" /></p>

<p>Notice that we don’t have an image of the results. We can capture that as part of the testing.</p>

<p>Following the Docs as Tests ideal that each doc is a test spec, each procedure a test case, and each step an assertion, we can break the procedure into the following testable statements:</p>

<ol>
  <li>Users should be able to navigate to <a href="www.google.com">www.google.com</a>.</li>
  <li>There is a search bar.</li>
  <li>After entering text into the search bar and pressing Enter, search results appear.</li>
</ol>

<p>Additionally, there is the screenshot that we want to automatically capture.</p>

<p>To do all of this, we’ll create and run a Cypress test that steps through each of the action. First though, let’s get Cypress ready on your machine.</p>

<h2 id="install-cypress">Install Cypress</h2>

<p>If you already have Cypress installed, skip to the next section.</p>

<p>Before you can get Cypress running, you need the prerequisites:</p>

<ul>
  <li>Node.js. I like using <a href="https://github.com/nvm-sh/nvm">Node Version Manager</a>, or you can use the <a href="https://nodejs.org/">official installers</a>.</li>
</ul>

<p>Once you have those installed, you can install Cypress with NPM.</p>

<ol>
  <li>
    <p>Open your terminal and run the following command to install Cypress on your machine:</p>

    <div class="language-bash highlighter-rouge"><div class="highlight"><pre class="highlight"><code> npm <span class="nb">install </span>cypress
 npx cypress open
</code></pre></div>    </div>

    <p>The Cypress Test Runner opens.</p>
  </li>
  <li>
    <p>Click <strong>E2E Testing</strong>, click <strong>Chrome</strong>, then click <strong>Start E2E Testing in Chrome</strong>. This opens a new browser window with Cypress running.</p>
  </li>
</ol>

<h2 id="write-the-test">Write the test</h2>

<p>Cypress tests are written in JavaScript or TypeScript—we’ll use JavaScript for simplicity. Here’s a test that validates the procedure we wrote earlier. Create a new file called <em>kitten-search.cy.js</em> in the <em>cypress/e2e</em> directory of your project, and add the following code:</p>

<div class="language-javascript highlighter-rouge"><div class="highlight"><pre class="highlight"><code><span class="c1">// kitten-search.cy.js</span>
<span class="nf">describe</span><span class="p">(</span><span class="dl">'</span><span class="s1">Google Search</span><span class="dl">'</span><span class="p">,</span> <span class="p">()</span> <span class="o">=&gt;</span> <span class="p">{</span>
  <span class="nf">it</span><span class="p">(</span><span class="dl">'</span><span class="s1">Navigates to Google</span><span class="dl">'</span><span class="p">,</span> <span class="p">()</span> <span class="o">=&gt;</span> <span class="p">{</span>
      <span class="nx">cy</span><span class="p">.</span><span class="nf">visit</span><span class="p">(</span><span class="dl">'</span><span class="s1">https://www.google.com</span><span class="dl">'</span><span class="p">);</span>
      <span class="nx">cy</span><span class="p">.</span><span class="nf">url</span><span class="p">().</span><span class="nf">should</span><span class="p">(</span><span class="dl">'</span><span class="s1">include</span><span class="dl">'</span><span class="p">,</span> <span class="dl">'</span><span class="s1">google.com</span><span class="dl">'</span><span class="p">);</span>
      <span class="nx">cy</span><span class="p">.</span><span class="nf">get</span><span class="p">(</span><span class="dl">'</span><span class="s1">[name="q"]</span><span class="dl">'</span><span class="p">).</span><span class="nf">should</span><span class="p">(</span><span class="dl">'</span><span class="s1">be.visible</span><span class="dl">'</span><span class="p">);</span>
      <span class="nx">cy</span><span class="p">.</span><span class="nf">get</span><span class="p">(</span><span class="dl">'</span><span class="s1">[name="q"]</span><span class="dl">'</span><span class="p">).</span><span class="nf">type</span><span class="p">(</span><span class="dl">'</span><span class="s1">American Shorthair kittens{enter}</span><span class="dl">'</span><span class="p">);</span>
      <span class="nx">cy</span><span class="p">.</span><span class="nf">get</span><span class="p">(</span><span class="dl">'</span><span class="s1">#center_col</span><span class="dl">'</span><span class="p">).</span><span class="nf">should</span><span class="p">(</span><span class="dl">'</span><span class="s1">be.visible</span><span class="dl">'</span><span class="p">);</span>
      <span class="nx">cy</span><span class="p">.</span><span class="nf">screenshot</span><span class="p">(</span><span class="dl">'</span><span class="s1">search-results</span><span class="dl">'</span><span class="p">,</span> <span class="p">{</span><span class="na">capture</span><span class="p">:</span> <span class="dl">'</span><span class="s1">viewport</span><span class="dl">'</span><span class="p">});</span>
  <span class="p">});</span>
<span class="p">});</span>
</code></pre></div></div>

<p>Let’s break down each portion of the test:</p>

<ol>
  <li><code class="language-plaintext highlighter-rouge">describe</code> and <code class="language-plaintext highlighter-rouge">it</code> are Mocha functions that help organize your tests. <code class="language-plaintext highlighter-rouge">describe</code> is a suite of tests, and <code class="language-plaintext highlighter-rouge">it</code> is an individual test.</li>
  <li><code class="language-plaintext highlighter-rouge">cy.visit</code> navigates to the specified URL.</li>
  <li><code class="language-plaintext highlighter-rouge">cy.url().should('include', 'google.com')</code> checks that the URL includes “google.com”.</li>
  <li><code class="language-plaintext highlighter-rouge">cy.get('[name="q"]').should('be.visible')</code> checks that the search bar is visible.</li>
  <li><code class="language-plaintext highlighter-rouge">cy.get('[name="q"]').type('American Shorthair kittens{enter}')</code> types “American Shorthair kittens” into the search bar and presses Enter.</li>
  <li><code class="language-plaintext highlighter-rouge">cy.get('#center_col').should('be.visible')</code> checks that the search results are visible.</li>
  <li><code class="language-plaintext highlighter-rouge">cy.screenshot('search-results', {capture: 'viewport'})</code> captures a screenshot of the viewport and saves it as <em>cypress/screenshots/search-results.png</em>.</li>
</ol>

<p><strong>Note:</strong> With Cypress, you have to write your tests in the correct directory or Cypress won’t recognize them. Additionally, you can’t embed them in your content, so you have to maintain them separately from your docs. This can make it difficult to keep your tests in sync with your content, especially if you’re iterating on your content frequently.</p>

<p>Now let’s run the test!</p>

<h2 id="run-the-test-in-the-cypress-test-runner">Run the test in the Cypress Test Runner</h2>

<p>In the Cypress Test Runner,</p>

<ol>
  <li>Click <strong>Specs</strong> in the side navigation.</li>
  <li>Find and click <strong>kitten-search.cy.js</strong>.</li>
</ol>

<p>Cypress opens and runs the test in your browser. You’ll see the test steps in the left pane and the browser window in the right pane. When the test is done, you’ll see a green checkmark next to the test name, indicating that it passed, and you’ll find a new screenshot in the <em>cypress/screenshots</em> directory.</p>

<p>If you hover over the steps in the left pane, you can see the screenshots that Cypress took at each step. This is a great way to visually validate that your test is working as expected.</p>

<p>Move the new screenshot into the same directory as <em>kitten-search.md</em>, and the procedure now renders like this:</p>

<p><img src="/images/validate-ui-doc-detective-after.png" alt="Rendered preview of kitten-search.md with screenshot" /></p>

<p>Congratulations, you ran your first Cypress test!</p>

<h2 id="run-the-test-from-the-command-line">Run the test from the command line</h2>

<p>You can also run your tests from the command line. This is useful for running your tests in continuous integration (CI), or for running your tests in a headless browser.</p>

<p>In your terminal, run the following command to run your test in a headless browser:</p>

<div class="language-bash highlighter-rouge"><div class="highlight"><pre class="highlight"><code>npx cypress run <span class="nt">--spec</span> <span class="s2">"cypress/e2e/kitten-search.cy.js"</span>
</code></pre></div></div>

<p>Cypress runs your test in a headless browser and outputs the results to the terminal. You’ll see a summary of the test results, including the number of tests that passed and failed, and the time it took to run the tests.</p>

<h2 id="what-else-can-it-do">What else can it do?</h2>

<p>Cypress is a powerful tool that can do a lot more than what we’ve covered here, as long as your comfortable with JavaScript or TypeScript. For example, you can:</p>

<ul>
  <li><a href="https://docs.cypress.io/guides/guides/continuous-integration.html">Run your tests in CI</a> to validate your docs on every commit.</li>
  <li><a href="https://docs.cypress.io/api/cypress-api/custom-commands.html">Use custom commands</a> to abstract common actions and make your tests more readable.</li>
  <li><a href="https://docs.cypress.io/plugins/index.html">Use plugins</a> to extend Cypress’s functionality.</li>
</ul>

<p>You can also use Cypress to validate other UI-based procedures, like filling out forms, navigating a website, or interacting with a web app. Cypress is a great tool for validating UI-based procedures, and it’s a great addition to your Docs as Tests strategy.</p>

<hr />

<h2 id="about-the-tool">About the tool</h2>

<p><a href="cypress.io">Cypress</a> is a popular end-to-end testing framework that’s easy to use and has a great community. If you’re familiar with JavaScript or TypeScript, it’s a great choice for testing your documentation against your product UIs and APIs. For more information, see the <a href="https://docs.cypress.io/guides/overview/why-cypress.html">Cypress documentation</a>.</p>

<hr />

<p>Thanks for reading. If you like what you read here, <a href="http://eepurl.com/iHb1CE">sign up for the newsletter</a> to stay up to date on Docs as Tests discussions, share this article with those you think would appreciate it, or sound off in the comments below.</p>]]></content><author><name>Manny Silva</name></author><category term="tutorial" /><category term="cypress" /><summary type="html"><![CDATA[Docs as Tests is a strategy for using docs to test a product, validating both that the docs are accurate and that the product is functioning as expected. That’s a great aspiration, but what does it look like in practice?]]></summary><media:thumbnail xmlns:media="http://search.yahoo.com/mrss/" url="https://www.docsastests.com/images/validate-ui-with-cypress.webp" /><media:content medium="image" url="https://www.docsastests.com/images/validate-ui-with-cypress.webp" xmlns:media="http://search.yahoo.com/mrss/" /></entry><entry><title type="html">Docs as Tests: From Development to Production</title><link href="https://www.docsastests.com/from-development-to-production" rel="alternate" type="text/html" title="Docs as Tests: From Development to Production" /><published>2024-02-21T00:00:00+00:00</published><updated>2024-02-21T00:00:00+00:00</updated><id>https://www.docsastests.com/from-development-to-production</id><content type="html" xml:base="https://www.docsastests.com/from-development-to-production"><![CDATA[<p>The Docs as Tests methodology stems from a simple but profound principle: documentation shouldn’t just inform—it should also verify. By treating each piece of documentation as a test case that gets executed against the product, teams can preemptively identify discrepancies and ensure that what users read is what they get.</p>

<p>In practice, this process means defining and running automated tests based on what the documentation says about the product. Ideally, these tests should run every time updates to the product’s code is updated. However, updates to the code often occur in different environments, such as development, staging, and production. Each of these environments can benefit from adding doc-based tests, but each environment benefits in different ways.</p>

<h2 id="using-docs-as-tests-across-development-environments">Using Docs as Tests across development environments</h2>

<p>How you apply Docs as Tests varies significantly across different stages of the development lifecycle, and each stage has unique advantages and challenges. Let’s delve into how this strategy plays out in development, staging, and production environments, outlining the potential benefits and pitfalls within each.</p>

<h2 id="development-environment">Development environment</h2>

<p>The dev branch is a churning sea of iteration, experimentation, and changes that are checking if an idea will work and figuring out how to make it work well later. As the name of this environment suggests, it’s mainly the environment where developers work, and so most of the advantages Docs as Tests deliver here will be ones focused on developers.</p>

<h3 id="advantages">Advantages</h3>

<ol>
  <li><strong>Early error detection:</strong> Implementing Docs as Tests in the development phase allows for the early identification of inconsistencies between the product and its documentation. Even if developers ignore these inconsistencies until they complete development, letting developers know early helps get this information to content teams sooner than later.</li>
  <li><strong>Immediate feedback loop:</strong> Developers receive real-time feedback on their changes, ensuring that new features or modifications align with documented expectations from the outset.</li>
  <li><strong>Documentation quality:</strong> Engaging with documentation during development ensures it evolves alongside the product, fostering a higher standard of accuracy and comprehensiveness.</li>
</ol>

<h3 id="pitfalls">Pitfalls</h3>

<p>When it’s implemented correctly, Docs as Tests shouldn’t be disruptive to development. However, there are some pitfalls that teams may fall into:</p>

<ol>
  <li><strong>Test creation overhead:</strong> Crafting testable documentation in a dynamic development environment demands significant effort and foresight, potentially slowing down the innovation process.</li>
  <li><strong>Maintenance burden:</strong> The fluid nature of development means documentation and tests must be continually updated, imposing an additional maintenance load on teams.</li>
  <li><strong>Risk of disruption:</strong> Introducing rigorous Docs as Tests requirements during development may hinder rapid prototyping and experimentation, stifling creativity.</li>
</ol>

<p>The goal for using Docs as Tests in a dev environment is to help developers know when they make a change that affects the accuracy of the docs without slowing down their development. The main way to avoid this pitfall is to have broken tests warn developers rather than serve as a gate on pushing their code to the development environment. If developers see that their updates are causing a test to fail and they’re getting ready to merge their branch into the main repository, then they should consider whether there are any final changes they can make to realign the product’s behavior with the expectations the doc set. If they can’t, then they should share this information with whichever team is responsible for updating documentation as soon as possible so that the team can begin tracking the issue and preparing doc updates for the next release.</p>

<h2 id="staging-environment">Staging environment</h2>

<p>The staging environment is the dress rehearsal for releasing software. This is the first environment where everybody with a stake in the documentation should be closely watching the outcome of the tests and scrambling when they fail.</p>

<h3 id="advantages-1">Advantages</h3>

<ol>
  <li><strong>Pre-release validation:</strong> The staging environment mirrors the production environment and is ideal for validating the documentation against the near-final version of the product, ensuring that any discrepancies are caught before public release.</li>
  <li><strong>Team communication and synergy:</strong> This phase fosters collaboration between developers, QA, and technical writers, creating a multidisciplinary review process.</li>
  <li><strong>Actionable insights:</strong> If a test is failing for the docs in the staging environment, it means the test will fail when the software is released. This indicates early to the team that they will need to take some action to fix the problem.</li>
</ol>

<p>While Docs as Tests works well in each environment, many of its most significant advantages are visible in staging. Developer environments are early enough in the process, but they move fast and most things in them are subject to change. If a test fails in the morning, it may pass in the afternoon once a dev makes their next commit. Production tests are valuable and can alert the team to issues that are already in front of users, but it’s even better to solve problems before users have a chance to see them.</p>

<p>The staging environment is where issues can be detected early enough for teams to have the time to thoughtfully pick and implement the best solution to the discrepancies. Technical writers and other content team members should audit failed tests for deliberate changes to the product and include content and test updates for those tests in the go-to-market plan for the upcoming release.</p>

<h2 id="production-environment">Production environment</h2>

<p>The production environment is the software that users are actually using and is the environment you really want to make sure your docs match. Docs as Tests has you covered for this use case.</p>

<h3 id="advantages-2">Advantages</h3>

<ol>
  <li><strong>Real-world accuracy:</strong> Try as teams might to mitigate them, there are always potential discrepancies in documentation in the live environment, which ensures it reflects the actual user experience, reinforcing user trust and satisfaction.</li>
  <li><strong>Continuous refinement:</strong> The production environment allows for ongoing monitoring and updating of documentation, adapting in real time to product changes and user feedback.</li>
  <li><strong>Emergency detection:</strong> If something goes wrong in production that breaks the accuracy of the documentation, regularly executing doc tests will let you know so your team can spring into action.</li>
</ol>

<p>Most of the advantages of Docs as Tests for the production environment come from the ability to detect doc discrepancies in the environment where users can find them. The key here is that the tests provide teams with the ability to immediately respond to issues either with patches or doc updates as soon as the problem occurs. With any luck, you never <em>need</em> these tests, but it’s always better to have them than not.</p>

<h2 id="how-many-environments-should-you-cover">How many environments should you cover?</h2>

<p>Ideally, you should cover all of the development environments your product is in. However, things are rarely ideal, so there are a number of ways you can set up coverage depending on how much effort you are able to expend. Let’s go through a few possible implementations.</p>

<h3 id="decent">Decent</h3>

<ul>
  <li><strong>Production</strong>: Test once per release (including hotfixes) to verify that all necessary changes were made to the docs. Test failures should trigger issue creation/notifications/investigations to the appropriate teams.</li>
</ul>

<h3 id="good">Good</h3>

<ul>
  <li><strong>Staging:</strong> Test once per push into the staging environment to verify that all necessary changes were made to the docs for the release. Test failures should trigger notifications/investigations to the appropriate teams. There should be no failures when a feature goes into Production.</li>
  <li><strong>Production</strong>: Test once per release (including hotfixes) to verify that all necessary changes were made to the docs. Test failures should trigger issue creation/notifications/investigations to the appropriate teams.</li>
</ul>

<h3 id="better">Better</h3>

<ul>
  <li><strong>Staging:</strong> Test once per push into the staging environment to verify that all necessary changes were made to the docs for the release. Test failures should trigger notifications/investigations to the appropriate teams. There should be no failures when a feature goes into Production.</li>
  <li><strong>Production:</strong>
    <ul>
      <li>Test once per release (including hotfixes) to verify that all necessary changes were made to the docs. Test failures should trigger issue creation/notifications/investigations to the appropriate teams.</li>
      <li>Test daily to catch critical, active issues. Test failures should trigger issue creation/notifications/investigations to the appropriate teams.</li>
    </ul>
  </li>
</ul>

<h3 id="best">Best</h3>

<ul>
  <li><strong>Staging:</strong> Test once per push into the staging environment to verify that all necessary changes were made to the docs for the release. Test failures should trigger notifications/investigations to the appropriate teams. There should be no failures when a feature goes into Production.</li>
  <li><strong>Production:</strong>
    <ul>
      <li>Test once per release (including hotfixes) to verify that all necessary changes were made to the docs. Test failures should trigger issue creation/notifications/investigations to the appropriate teams.</li>
      <li>Test daily to catch critical, active issues. Test failures should trigger issue creation/notifications/investigations to the appropriate teams.</li>
    </ul>
  </li>
  <li><strong>Development:</strong> Test in-development features ad-hoc to check feature completeness and doc content accuracy. Test failures should only trigger warnings. There should be no failures when a feature goes into Staging.</li>
</ul>

<h2 id="the-right-approach-for-each-environment">The right approach for each environment</h2>

<p>Whatever environment you use Docs as Tests in, it will give you more insight into how accurate your docs are compared to the latest version of your product whether that version is being cut for release or just the latest commit during development. What you do with that information varies between environments. During development, it could mean making a couple changes before merging your current feature branch while in staging it may mean planning content updates in advance of the release. In most environments, failed tests should prompt communication between engineering and content teams to make sure everybody knows what needs to happen to make sure users are supported by docs that help them navigate an evolving product.</p>]]></content><author><name>Niko Berry</name></author><category term="docs-as-tests" /><category term="environments" /><category term="development" /><category term="staging" /><category term="production" /><summary type="html"><![CDATA[The Docs as Tests methodology stems from a simple but profound principle: documentation shouldn’t just inform—it should also verify. By treating each piece of documentation as a test case that gets executed against the product, teams can preemptively identify discrepancies and ensure that what users read is what they get.]]></summary><media:thumbnail xmlns:media="http://search.yahoo.com/mrss/" url="https://www.docsastests.com/images/environments.webp" /><media:content medium="image" url="https://www.docsastests.com/images/environments.webp" xmlns:media="http://search.yahoo.com/mrss/" /></entry><entry><title type="html">Validate Commands and Scripts with Doc Detective</title><link href="https://www.docsastests.com/validate-scripts-with-doc-detective" rel="alternate" type="text/html" title="Validate Commands and Scripts with Doc Detective" /><published>2024-02-13T00:00:00+00:00</published><updated>2024-02-13T00:00:00+00:00</updated><id>https://www.docsastests.com/validate-scripts-with-doc-detective</id><content type="html" xml:base="https://www.docsastests.com/validate-scripts-with-doc-detective"><![CDATA[<p>We’ve covered how to validate <a href="/validate-ui-with-doc-detective">UI procedures</a> and <a href="/validate-api-with-doc-detective">API procedures</a> with Doc Detective, but what about shell commands and scripts? After all, not every procedure is navigating through UIs or making API calls.</p>

<p>Today, I’ll walk you through validating both shell commands and scripts, using the commands from the UI validation tutorial as a starting point. We’ll use Doc Detective to validate that the commands work as expected and show how you can run scripts to validate code or commands written in other languages.</p>

<p>(Disclosure: I’m the creator of Doc Detective, but I’ll try to keep this as objective as possible. If you have questions, feel free to reach out in the comments, on social media, or on <a href="https://discord.com/invite/sgnE22uZ9w">Discord</a>.)</p>

<p>This is going to get a little meta!</p>

<h2 id="the-setup">The setup</h2>

<p>In the UI validation tutorial, we validated a procedure for searching for American Shorthair kittens on Google, but if you look at all the steps involved, a lot was going on:</p>

<ol>
  <li>Install Doc Detective.</li>
  <li>Save the procedure as a Markdown file.</li>
  <li>Write a test in JSON.</li>
  <li>Run the test.</li>
  <li>Validate the results.</li>
</ol>

<p>The secret to validating shell commands and scripts is Doc Detective’s <a href="https://doc-detective.com/reference/schemas/runShell.html">runShell</a> action. This action lets you run a shell command or script and validate the results.</p>

<p>We’ll do this a few ways: first, we’ll test individual commands and validate them one at a time, then we’ll create and run a script to perform the whole UI validation procedure in one go, and finally I’ll show you how to validate scripts in whatever language you prefer. Before that though, let’s get Doc Detective ready on your machine.</p>

<h2 id="install-doc-detective">Install Doc Detective</h2>

<p>If you already have Doc Detective installed, skip to the next section.</p>

<p>Before you can get Doc Detective running, you need the prerequisites:</p>

<ul>
  <li>Node.js 18 or higher. I like using <a href="https://github.com/nvm-sh/nvm">Node Version Manager</a>, or you can use the <a href="https://nodejs.org/">official installers</a>.</li>
  <li><a href="https://git-scm.com/">Git</a></li>
</ul>

<p>Once you have those installed, you can clone Doc Detective to your machine and install dependencies:</p>

<div class="language-plaintext highlighter-rouge"><div class="highlight"><pre class="highlight"><code>git clone https://github.com/doc-detective/doc-detective.git
cd doc-detective
npm install
</code></pre></div></div>

<h2 id="validate-individual-commands">Validate individual commands</h2>

<p>Running shell commands and scripts with Doc Detective is straightforward. The command or script runs in your device’s native shell (<code class="language-plaintext highlighter-rouge">cmd</code> on Windows and <code class="language-plaintext highlighter-rouge">bash</code> on macOS and Linux), and if the command or script returns a non-zero exit code, the test fails.</p>

<p>We can test this out with a single test that has two steps. The first step runs a command that should pass, and the second step runs a command that should fail. Let’s save this test as <em>command-validation.spec.json</em>:</p>

<div class="language-json highlighter-rouge"><div class="highlight"><pre class="highlight"><code><span class="p">{</span><span class="w">
  </span><span class="nl">"tests"</span><span class="p">:</span><span class="w"> </span><span class="p">[</span><span class="w">
    </span><span class="p">{</span><span class="w">
      </span><span class="nl">"id"</span><span class="p">:</span><span class="w"> </span><span class="s2">"single-command-validation"</span><span class="p">,</span><span class="w">
      </span><span class="nl">"description"</span><span class="p">:</span><span class="w"> </span><span class="s2">"The first step should pass. The second step should fail."</span><span class="p">,</span><span class="w">
      </span><span class="nl">"steps"</span><span class="p">:</span><span class="w"> </span><span class="p">[</span><span class="w">
        </span><span class="p">{</span><span class="w">
          </span><span class="nl">"action"</span><span class="p">:</span><span class="w"> </span><span class="s2">"runShell"</span><span class="p">,</span><span class="w">
          </span><span class="nl">"command"</span><span class="p">:</span><span class="w"> </span><span class="s2">"echo 'Hello, world!'"</span><span class="w">
        </span><span class="p">},</span><span class="w">
        </span><span class="p">{</span><span class="w">
          </span><span class="nl">"action"</span><span class="p">:</span><span class="w"> </span><span class="s2">"runShell"</span><span class="p">,</span><span class="w">
          </span><span class="nl">"command"</span><span class="p">:</span><span class="w"> </span><span class="s2">"exit 1"</span><span class="w">
        </span><span class="p">}</span><span class="w">
      </span><span class="p">]</span><span class="w">
    </span><span class="p">}</span><span class="w">
  </span><span class="p">]</span><span class="w">
</span><span class="p">}</span><span class="w">
</span></code></pre></div></div>

<p>Now, let’s run the test:</p>

<div class="language-bash highlighter-rouge"><div class="highlight"><pre class="highlight"><code>npm run runTests <span class="nt">--</span> <span class="nt">-i</span> command-validation.spec.json
</code></pre></div></div>

<p>Great! We see that the first command passed and the second command failed. This is exactly what we expected because the second command exits with a non-zero exit code. But while these steps test individual commands, you’ll often want to run a script to test multiple commands at once. Let’s look at how to do that.</p>

<h2 id="validate-a-bash-script">Validate a bash script</h2>

<p><strong>Note:</strong> The following commands are for a <code class="language-plaintext highlighter-rouge">bash</code> shell. If you’re using Windows, make sure <code class="language-plaintext highlighter-rouge">bash</code> is available from <code class="language-plaintext highlighter-rouge">cmd</code>, such as through <a href="https://docs.microsoft.com/en-us/windows/wsl/install">Windows Subsystem for Linux</a> or <a href="https://git-scm.com/downloads">Git Bash</a>.</p>

<p>Let’s look at each of the steps in the UI validation procedure and identify commands that would complete them:</p>

<ol>
  <li>
    <p>Install Doc Detective:</p>

    <div class="language-bash highlighter-rouge"><div class="highlight"><pre class="highlight"><code> git clone https://github.com/doc-detective/doc-detective.git
 <span class="nb">cd </span>doc-detective
 npm <span class="nb">install</span>
</code></pre></div>    </div>
  </li>
  <li>
    <p>Save the procedure as a Markdown file:</p>

    <div class="language-bash highlighter-rouge"><div class="highlight"><pre class="highlight"><code> <span class="nb">echo</span> <span class="nt">-e</span> <span class="s1">'To search for American Shorthair kittens,\n\n1. Go to [Google](https://www.google.com).\n\n2. In the search bar, enter \"American Shorthair kittens\", then press Enter.\n\n![Search results](search-results.png)'</span> <span class="o">&gt;</span> kitten-search.md
</code></pre></div>    </div>
  </li>
  <li>
    <p>Write a test in JSON:</p>

    <div class="language-bash highlighter-rouge"><div class="highlight"><pre class="highlight"><code> <span class="nb">echo</span> <span class="nt">-e</span> <span class="s1">'{ "tests": [ { "steps": [ { "action": "goTo", "url": "https://www.google.com" }, { "action": "find", "selector": "[title=Search]", "click": true }, { "action": "typeKeys", "keys": ["American Shorthair kittens", "$ENTER$"] }, { "action": "wait", "duration": 5000 }, { "action": "saveScreenshot", "path": "search-results.png" } ] } ]}'</span> <span class="o">&gt;</span> kitten-search.spec.json
</code></pre></div>    </div>
  </li>
  <li>
    <p>Run the test:</p>

    <div class="language-bash highlighter-rouge"><div class="highlight"><pre class="highlight"><code> npm run runTests <span class="nt">--</span> <span class="nt">-i</span> kitten-search.spec.json
</code></pre></div>    </div>
  </li>
  <li>
    <p>Validate the results, in this case by checking that the screenshot and test results files exist:</p>

    <div class="language-bash highlighter-rouge"><div class="highlight"><pre class="highlight"><code> <span class="nv">FILE</span><span class="o">=</span>search-results.png<span class="p">;</span> <span class="k">if</span> <span class="o">[</span> <span class="nt">-f</span> <span class="s2">"</span><span class="nv">$FILE</span><span class="s2">"</span> <span class="o">]</span><span class="p">;</span> <span class="k">then </span><span class="nb">echo</span> <span class="s2">"File </span><span class="nv">$FILE</span><span class="s2"> exists."</span><span class="p">;</span> <span class="k">else </span><span class="nb">false</span><span class="p">;</span> <span class="k">fi
 for </span>file <span class="k">in </span>testResults-<span class="k">*</span>.json<span class="p">;</span> <span class="k">do</span> <span class="o">[</span> <span class="nt">-e</span> <span class="s2">"</span><span class="nv">$file</span><span class="s2">"</span> <span class="o">]</span> <span class="o">&amp;&amp;</span> <span class="nb">echo</span> <span class="s2">"File </span><span class="nv">$file</span><span class="s2"> exists."</span> <span class="o">||</span> <span class="nb">false</span><span class="p">;</span> <span class="nb">break</span><span class="p">;</span> <span class="k">done</span>
</code></pre></div>    </div>
  </li>
</ol>

<p>If you wanted to validate each of these commands individually, you could, but that’s a lot of work. Instead, let’s create a <code class="language-plaintext highlighter-rouge">bash</code> script. Save the following script as <em>ui-validation.sh</em>:</p>

<div class="language-bash highlighter-rouge"><div class="highlight"><pre class="highlight"><code><span class="c"># ui-validation.sh</span>
<span class="c">#</span>
<span class="c"># !/bin/bash</span>
git clone https://github.com/doc-detective/doc-detective.git
<span class="nb">cd </span>doc-detective
npm <span class="nb">install
echo</span> <span class="nt">-e</span> <span class="s1">'To search for American Shorthair kittens,\n\n1. Go to [Google](https://www.google.com).\n\n2. In the search bar, enter \"American Shorthair kittens\", then press Enter.\n\n![Search results](search-results.png)'</span> <span class="o">&gt;</span> kitten-search.md
<span class="nb">echo</span> <span class="nt">-e</span> <span class="s1">'{ "tests": [ { "steps": [ { "action": "goTo", "url": "https://www.google.com" }, { "action": "find", "selector": "[title=Search]", "click": true }, { "action": "typeKeys", "keys": ["American Shorthair kittens", "$ENTER$"] }, { "action": "wait", "duration": 5000 }, { "action": "saveScreenshot", "path": "search-results.png" } ] } ]}'</span> <span class="o">&gt;</span> kitten-search.spec.json
npm run runTests <span class="nt">--</span> <span class="nt">-i</span> kitten-search.spec.json
<span class="nv">FILE</span><span class="o">=</span>search-results.png<span class="p">;</span> <span class="k">if</span> <span class="o">[</span> <span class="nt">-f</span> <span class="s2">"</span><span class="nv">$FILE</span><span class="s2">"</span> <span class="o">]</span><span class="p">;</span> <span class="k">then </span><span class="nb">echo</span> <span class="s2">"File </span><span class="nv">$FILE</span><span class="s2"> exists."</span><span class="p">;</span> <span class="k">else </span><span class="nb">exit </span>1<span class="p">;</span> <span class="k">fi
for </span>file <span class="k">in </span>testResults-<span class="k">*</span>.json<span class="p">;</span> <span class="k">do</span> <span class="o">[</span> <span class="nt">-e</span> <span class="s2">"</span><span class="nv">$file</span><span class="s2">"</span> <span class="o">]</span> <span class="o">&amp;&amp;</span> <span class="nb">echo</span> <span class="s2">"File </span><span class="nv">$file</span><span class="s2"> exists."</span> <span class="o">||</span> <span class="nb">exit </span>1<span class="p">;</span> <span class="nb">break</span><span class="p">;</span> <span class="k">done</span>
</code></pre></div></div>

<p>Now, we can validate the whole procedure with a single command. Let’s save this test as <em>ui-validation.spec.json</em>:</p>

<div class="language-json highlighter-rouge"><div class="highlight"><pre class="highlight"><code><span class="p">{</span><span class="w">
  </span><span class="nl">"tests"</span><span class="p">:</span><span class="w"> </span><span class="p">[</span><span class="w">
    </span><span class="p">{</span><span class="w">
      </span><span class="nl">"id"</span><span class="p">:</span><span class="w"> </span><span class="s2">"ui-validation"</span><span class="p">,</span><span class="w">
      </span><span class="nl">"description"</span><span class="p">:</span><span class="w"> </span><span class="s2">"Validate the UI procedure for searching for American Shorthair kittens on Google."</span><span class="p">,</span><span class="w">
      </span><span class="nl">"steps"</span><span class="p">:</span><span class="w"> </span><span class="p">[</span><span class="w">
        </span><span class="p">{</span><span class="w">
          </span><span class="nl">"action"</span><span class="p">:</span><span class="w"> </span><span class="s2">"runShell"</span><span class="p">,</span><span class="w">
          </span><span class="nl">"command"</span><span class="p">:</span><span class="w"> </span><span class="s2">"bash ui-validation.sh"</span><span class="w">
        </span><span class="p">}</span><span class="w">
      </span><span class="p">]</span><span class="w">
    </span><span class="p">}</span><span class="w">
  </span><span class="p">]</span><span class="w">
</span><span class="p">}</span><span class="w">
</span></code></pre></div></div>

<p>Now that we have our test and script, let’s run it. Note that while the script is running, we won’t see any output in the terminal. Please be patient.</p>

<div class="language-bash highlighter-rouge"><div class="highlight"><pre class="highlight"><code>npm run runTests <span class="nt">--</span> <span class="nt">-i</span> ui-validation.spec.json
</code></pre></div></div>

<p>This script is a little more complex than the others, but it’s a great way to validate a whole procedure in one go.</p>

<h2 id="validate-other-kinds-of-scripts">Validate other kinds of scripts</h2>

<p>Script validation isn’t limited to <code class="language-plaintext highlighter-rouge">bash</code>. As long as your script can return a non-zero exit code, in can be in any language you like, whether that’s JavaScript, Python, Ruby, or whatever else. Any command you can run from the command line, you can validate with Doc Detective. Need to validate an SDK? Write a script and go for it.</p>

<p>For example, here’s a script that validates only the outputs of our UI procedure. Save this script as <em>validate-kitten-search-outputs.js</em>:</p>

<div class="language-javascript highlighter-rouge"><div class="highlight"><pre class="highlight"><code><span class="c1">// validate-kitten-search-outputs.js</span>
<span class="kd">const</span> <span class="nx">fs</span> <span class="o">=</span> <span class="nf">require</span><span class="p">(</span><span class="dl">'</span><span class="s1">fs</span><span class="dl">'</span><span class="p">);</span>

<span class="kd">const</span> <span class="nx">FILE</span> <span class="o">=</span> <span class="dl">'</span><span class="s1">search-results.png</span><span class="dl">'</span><span class="p">;</span>
<span class="k">if </span><span class="p">(</span><span class="nx">fs</span><span class="p">.</span><span class="nf">existsSync</span><span class="p">(</span><span class="nx">FILE</span><span class="p">))</span> <span class="p">{</span>
  <span class="nx">console</span><span class="p">.</span><span class="nf">log</span><span class="p">(</span><span class="s2">`File </span><span class="p">${</span><span class="nx">FILE</span><span class="p">}</span><span class="s2"> exists.`</span><span class="p">);</span>
<span class="p">}</span> <span class="k">else</span> <span class="p">{</span>
  <span class="nx">process</span><span class="p">.</span><span class="nf">exit</span><span class="p">(</span><span class="mi">1</span><span class="p">);</span>
<span class="p">}</span>

<span class="kd">const</span> <span class="nx">files</span> <span class="o">=</span> <span class="nx">fs</span><span class="p">.</span><span class="nf">readdirSync</span><span class="p">(</span><span class="nx">process</span><span class="p">.</span><span class="nf">cwd</span><span class="p">());</span>
<span class="kd">const</span> <span class="nx">testResults</span> <span class="o">=</span> <span class="nx">files</span><span class="p">.</span><span class="nf">filter</span><span class="p">(</span><span class="nx">file</span> <span class="o">=&gt;</span> <span class="nx">file</span><span class="p">.</span><span class="nf">startsWith</span><span class="p">(</span><span class="dl">'</span><span class="s1">testResults-</span><span class="dl">'</span><span class="p">));</span>
<span class="k">if </span><span class="p">(</span><span class="nx">testResults</span><span class="p">.</span><span class="nx">length</span> <span class="o">&gt;</span> <span class="mi">0</span><span class="p">)</span> <span class="p">{</span>
  <span class="nx">console</span><span class="p">.</span><span class="nf">log</span><span class="p">(</span><span class="s2">`File </span><span class="p">${</span><span class="nx">testResults</span><span class="p">[</span><span class="mi">0</span><span class="p">]}</span><span class="s2"> exists.`</span><span class="p">);</span>
<span class="p">}</span> <span class="k">else</span> <span class="p">{</span>
  <span class="nx">process</span><span class="p">.</span><span class="nf">exit</span><span class="p">(</span><span class="mi">1</span><span class="p">);</span>
<span class="p">}</span>
</code></pre></div></div>

<p>We can test this just as easily as our other script. Save the following test as <em>js-validation.spec.json</em>:</p>

<div class="language-json highlighter-rouge"><div class="highlight"><pre class="highlight"><code><span class="p">{</span><span class="w">
  </span><span class="nl">"tests"</span><span class="p">:</span><span class="w"> </span><span class="p">[</span><span class="w">
    </span><span class="p">{</span><span class="w">
      </span><span class="nl">"id"</span><span class="p">:</span><span class="w"> </span><span class="s2">"js-validation"</span><span class="p">,</span><span class="w">
      </span><span class="nl">"description"</span><span class="p">:</span><span class="w"> </span><span class="s2">"Validate outputs for searching for American Shorthair kittens on Google."</span><span class="p">,</span><span class="w">
      </span><span class="nl">"steps"</span><span class="p">:</span><span class="w"> </span><span class="p">[</span><span class="w">
        </span><span class="p">{</span><span class="w">
          </span><span class="nl">"action"</span><span class="p">:</span><span class="w"> </span><span class="s2">"runShell"</span><span class="p">,</span><span class="w">
          </span><span class="nl">"command"</span><span class="p">:</span><span class="w"> </span><span class="s2">"node validate-kitten-search-outputs.js"</span><span class="w">
        </span><span class="p">}</span><span class="w">
      </span><span class="p">]</span><span class="w">
    </span><span class="p">}</span><span class="w">
  </span><span class="p">]</span><span class="w">
</span><span class="p">}</span><span class="w">
</span></code></pre></div></div>

<p>And finally, run the test:</p>

<div class="language-bash highlighter-rouge"><div class="highlight"><pre class="highlight"><code>npm run runTests <span class="nt">--</span> <span class="nt">-i</span> js-validation.spec.json
</code></pre></div></div>

<p>Just like the <code class="language-plaintext highlighter-rouge">bash</code> script and the individual commands before it, this script exits cleanly. You’re welcome to try deleting the output files and watching it fail too!</p>

<h2 id="one-more-thing">One more thing!</h2>

<p>If you’re not running Doc Detective as part of a script, you can use <code class="language-plaintext highlighter-rouge">runShell</code> to help set up your test environment. For example, you can use <code class="language-plaintext highlighter-rouge">runShell</code> to install dependencies, spin up Docker containers, or perform other setup tasks before running your tests. This is a great way to automate your tests and keep them self-contained.</p>

<h2 id="conclusion">Conclusion</h2>

<p>If you want to validate individual commands, to validate scripts in whichever language you require, or to automate your testing environment, Doc Detective is a powerful tool at your disposal. With Doc Detective, you can validate UIs, APIs, and everything in between to make sure your content works the way you and your users expect.</p>

<hr />

<h2 id="about-the-tool">About the tool</h2>

<p><a href="https://doc-detective.com">Doc Detective</a> is an open-source documentation testing framework. Doc Detective has multiple components to integrate with your workflows as you need it to:</p>

<ul>
  <li><a href="https://github.com/doc-detective/doc-detective">Doc Detective</a>: A standalone tool to test docs against product UIs and APIs.</li>
  <li><a href="https://github.com/doc-detective/doc-detective-companion">Doc Detective Companion</a>: A browser extension for <a href="https://chrome.google.com/webstore/detail/doc-detective-companion/dfpbndchffmilddiaccdcpoejljlaghm">Chrome</a> and <a href="https://addons.mozilla.org/en-US/firefox/addon/doc-detective-companion">Firefox</a> to help you build tests and find CSS selectors.</li>
  <li><a href="https://github.com/doc-detective/doc-detective-core">Doc Detective Core</a>: An NPM package that provides Doc Detective’s testing functionality.</li>
</ul>

<p>Doc Detective is open to contributions, and you can join the chat on <a href="https://discord.com/invite/sgnE22uZ9w">Discord</a>. If you like what you see, you can ⭐ star the repositories on GitHub or ❤️ sponsor development via <a href="https://opencollective.com/doc-detective">Open Collective</a> or <a href="https://github.com/sponsors/doc-detective">GitHub Sponsors</a>.</p>

<hr />

<p>Thanks for reading. If you like what you read here, <a href="http://eepurl.com/iHb1CE">sign up for the newsletter</a> to stay up to date on Docs as Tests discussions, share this article with those you think would appreciate it, or sound off in the comments below.</p>]]></content><author><name>Manny Silva</name></author><category term="tutorial" /><category term="doc-detective" /><category term="shell" /><category term="terminal" /><category term="scripts" /><category term="bash" /><category term="native" /><summary type="html"><![CDATA[We’ve covered how to validate UI procedures and API procedures with Doc Detective, but what about shell commands and scripts? After all, not every procedure is navigating through UIs or making API calls.]]></summary><media:thumbnail xmlns:media="http://search.yahoo.com/mrss/" url="https://www.docsastests.com/images/validate-scripts-with-doc-detective.webp" /><media:content medium="image" url="https://www.docsastests.com/images/validate-scripts-with-doc-detective.webp" xmlns:media="http://search.yahoo.com/mrss/" /></entry><entry><title type="html">Docs as Tests vs. Docs as Code</title><link href="https://www.docsastests.com/docs-as-tests-vs-docs-as-code" rel="alternate" type="text/html" title="Docs as Tests vs. Docs as Code" /><published>2024-02-07T00:00:00+00:00</published><updated>2024-02-07T00:00:00+00:00</updated><id>https://www.docsastests.com/docs-as-tests-vs-docs-as-code</id><content type="html" xml:base="https://www.docsastests.com/docs-as-tests-vs-docs-as-code"><![CDATA[<p>Documentation has the critical role of helping users keep their footing in the storm of continuous releases driven by the iterative nature of modern product development. While many people think of documentation as creating guides and references for new features, publishing them online, and moving on to the next feature, this simply doesn’t reflect the actual challenges of technical writing in the age of continuous deployment, agile development, continuous contact, and easy access to feedback from customers. Writing is a big part of docs, of course, but maintaining those docs slides into the background as the business, product, and audience shift around them.</p>

<p>How are docs supposed to keep up with this rate of change? Technical writers developed two schools of thought that answer these challenges. The first is Docs as Code, an approach to documentation that borrows tools and practices from programming to improve the quality of docs. A more recent school of thought to answer the challenges of rapidly evolving products is Docs as Tests, an approach to using tools to manage the relationship between docs and the product and ensure that docs don’t become stale as the product develops after you publish.</p>

<p>But what is the relationship between Docs as Code and Docs as Tests? They’re similarly named, but how deep do those similarities go? In this post we’ll compare and contrast the ideas and practices associated with these two schools of thought and show that Docs as Tests occupies a unique position as both:</p>

<ul>
  <li>A natural extension of Docs as Code.</li>
  <li>A standalone set of practices that can be applied outside of Docs as Code workflows.</li>
</ul>

<h2 id="docs-as-code">Docs as Code</h2>

<p>Docs as Code (and its more loosely defined sibling Docs like Code) is a philosophy about how to write documentation that borrows heavily from software development.</p>

<p>If you’re a technical writer, you might already know that our job isn’t just about writing technical instructions. When you work in a big organization or on a sizable project, you realize that the complexity grows as the number of instructions increases. Writing technical instructions becomes even more challenging when the documents, content silos, and the domain being covered are too large for any one author to have a full understanding of.</p>

<p>Docs as Code emerged when technical writers realized that another profession faces similar challenges around maintaining enormous, complicated instruction sets: Programmers. Even better, programmers already have practices and tools put together for handling these problems that technical writers can easily retrofit onto their own jobs.</p>

<p>Docs as Code is about studying the day-to-day challenges of managing enormous sets of instructions faced by both technical writers and programmers and trying to figure out how the disciplines can share their learnings to strengthen each other. After you understand those similarities, the tools and practices flow naturally.</p>

<h3 id="plaintext-as-the-medium-of-choice">Plaintext as the medium of choice</h3>

<p>People sometimes treat Docs as Code as a synonym for using plaintext (usually written with a developer-focused text editor) for authoring. Let’s think about the main reasons why Docs as Code favors plaintext markup languages like Markdown or Asciidoc and plaintext structures like Swagger JSON and YAML; it’s not just out of a desire to have technical writers cosplay as developers.</p>

<p>Reason one is all about separating concerns. In your typical word processor, both what the text says and how it looks are controlled through the same interface. This is convenient when you are writing small, one-off documents, but it doesn’t scale. Modern documentation projects are enormous, and updating their visual display to accommodate emerging best practices in web development, new branding guidelines, or even changing tastes is completely impractical to do manually; it must be done programmatically. Plaintext lets the author focus on the authoring, the designer focus on the visual design, and the developer focus on the underlying mechanics of the digital format the docs will be templated into.</p>

<p>Additionally, most plaintext markup languages have open specs that the development community is able to build new tools against. This results in a robust if chaotic ecosystem of options for building publishing toolchains for docs that fit into most dev teams’ skill sets and workflows.</p>

<h3 id="developer-style-version-control">Developer-style version control</h3>

<p>Because of its plaintext approach, Docs as Code also works with the gold standard of programming version control tools: Git. There are other version control tools for code but, in practice, Git is the one that sees use.</p>

<p>Working with Git provides more than just the tool to handle version control. If you just write docs without much thought and slap your entire day’s work into a single commit with a description like “Update!” you’re missing out on a lot of the power Docs as Code offers. Programming has a set of best practices for how developers can logically group changes using Git and how to describe them in commits. These practices translate neatly to documentation. When teams follow these practices, the Git history log provides a sort of ‘meta documentation’ about the context of the docs.  When this context is explicit:</p>

<ul>
  <li>New team members have an easier time becoming familiar with the specific design decisions that informed the docs.</li>
  <li>Long-time team members can recall why they made specific decisions about the docs years ago.</li>
</ul>

<p>Git even has a feature that tells you who to blame for a given section of a document.</p>

<h3 id="collaboration">Collaboration</h3>

<p>Developers write code in teams, and technical writers working on docs can adopt many of the tools that let them work in parallel, share feedback, and organize continuous changes to a highly complex code base. This is where Git, of course, but also Git platforms like Github, Bitbucket, or Gitkraken come into the picture.</p>

<h3 id="continuous-integration-and-deployment">Continuous integration and deployment</h3>

<p>Treating docs as code also allows the docs to be incorporated into a continuous integration or continuous deployment pipeline where the docs and their publishing toolchain are tested after each committed change to the docs. This helps ensure quality.</p>

<p>In the CI/CD phase of Docs as Code, you will sometimes see the idea of testing the docs mentioned. This practice has a similar name to Docs as Tests but is very different because it’s focused on the testable qualities of the docs such as its syntactic correctness, adherence to style guides, or readability scores.</p>

<h3 id="docs-as-code-the-point">Docs as Code: The point</h3>

<p>Docs as Code focuses on pulling in ideas and tools from software development to improve how docs are written and the specific ‘how’ is focused on how words get written, stored, updated, and tracked.</p>

<h2 id="docs-as-tests">Docs as Tests</h2>

<p>Docs as Test is about using docs as a set of tests for a product. Once the tests are in place, these tests continuously ensure that the documentation correctly describes the functionality of the product. If something changes in the product that makes one of the tests fail, whoever is in charge of the docs can begin identifying the discrepancy and either update the docs to reflect the current state of the product or identify the owners of the ongoing product issue.</p>

<p>Similarly to Docs as Code, Docs as Tests borrows ideas and tools from software engineering and applies them to documentation. However, where Docs as Code is mainly interested in borrowing the tools software developers use to write and manage code and apply them to writing the worst programming language (English) while targeting the most unreliable compiler (the human brain), Docs as Test looks at the ideas behind assertion testing in software development and realizes that they apply to documentation too.</p>

<h3 id="docs-make-assertions-about-the-product">Docs make assertions about the product</h3>

<p>From one perspective, documentation is a description of a product. However, in another way, documentation makes falsifiable assertions about a product.  When the docs say, “Pressing button A on screen B orders your pizza,” thanks to the power of UI automation, we can test that.</p>

<p>When docs say sending a GET request to the <code class="language-plaintext highlighter-rouge">/pizza</code> endpoint returns you a list of all of the objects representing the states of pizza, thanks to the power of API automation, we can test that.</p>

<p>This is the first focus of Docs as Tests: thinking about your documentation as an implicit set of tests that could be built for the documentation.</p>

<h3 id="the-docs-are-a-client">The Docs are a client</h3>

<p>Having tests that break when a product doesn’t perform the way the docs say they do changes the relationship between the docs and the product. It connects documentation to the product in a more tangible way than the “we’ll update it <em>eventually</em>” antipattern that is so easy to fall into when crunch time hits.</p>

<p>Having a slate of tests that alert the team to incongruities between what the docs say and what the product does, especially if the team can detect them ahead of launch, changes the relationship between the docs in a product in a way that somewhat mirrors the relationship between a client and its upstream dependency.</p>

<p>Even if engineering teams don’t see the documents as clients, they might still rethink the value of accurate documents when the tech writer is the one who catches a big bug before the release goes out.</p>

<h3 id="docs-as-tests-the-bottom-line">Docs as Tests: The bottom line</h3>

<p>Docs as Tests transforms how documentation and products interact, enhancing both their quality. It employs testing tools to identify stale docs as a product evolves and also spots defects from the product. This approach ensures both the documentation and the product stay relevant and error-free, leading to an improved user experience.</p>

<h2 id="comparing-docs-as-tests-and-docs-as-code">Comparing Docs as Tests and Docs as Code</h2>

<p>To summarize, Docs as Code applies principles and practices from software development to documentation, emphasizing the use of plain text for writing, version control for tracking changes, and continuous integration and deployment for maintaining quality. This approach treats documentation with the same rigor and discipline as code, allowing for more efficient updates, collaboration, and maintenance.</p>

<p>On the other hand, Docs as Tests takes the relationship between documentation and product functionality a step further by treating documentation as a series of tests for the product. This approach keeps documentation fresh and accurate to the current state of the product by automatically verifying that the features and behaviors described in the documentation match the actual product. If a discrepancy arises, the tool lets teams know so they can fix it.</p>

<p>While Docs as Code provides a robust framework for managing and maintaining documentation, Docs as Tests introduces a dynamic element that directly ties the accuracy of documentation to the product’s functionality. Both approaches offer significant benefits, but they are not mutually exclusive. In fact, integrating Docs as Tests within a Docs as Code framework can create a comprehensive documentation strategy that is both well-organized and consistently accurate, reflecting the current capabilities of the product. This synergy enhances the value of documentation, making it a more reliable and useful resource for users and an integral part of the development process.</p>

<p>With all of this in mind, let’s return to the ideas from the beginning of this post.</p>

<h3 id="docs-as-tests-are-a-natural-extension-of-docs-as-code">Docs as Tests are a natural extension of Docs as Code</h3>

<p>Docs as Tests is a natural extension to Docs as Code. A quick survey of both philosophies turns up several overlapping ideas. Both Docs as Code and Docs as Tests</p>

<ul>
  <li>pull documentation into a paradigm of tools and ideas familiar to developers.</li>
  <li>integrate neatly into developer-centric workflows.</li>
  <li>reduce the number of points where they need to context switch.</li>
  <li>are helpful on teams where developers are involved in the documentation process.</li>
</ul>

<p>In many ways, Docs as Code contains Docs as Tests within its set of ideas and tools. While Docs as Code started by taking on engineers’ authoring tooling and processes, Docs as Tests continues the trend by mapping engineers’ code testing practices to content written in plain language.</p>

<h3 id="docs-as-tests-are-a-standalone-set-of-practices">Docs as Tests are a standalone set of practices</h3>

<p>One of the beautiful things about Docs as Tests is that you can use it as a framework even if your docs barely resemble code. You could document in Wordpress, a Notion Wiki, an MS Word document, or even a set of instructions handwritten on a piece of paper could be a valid use case with Docs as Tests. Never actually do that last one, but if your life was ever so out of control that you needed to, you totally could.</p>

<p>In a practical sense, however, it would be very difficult to do Docs as Tests for non-Docs as Code workflows right now. This is due to a lack of good tools rather than an incompatibility between the Docs as Tests theory and non-Docs as Code workflows. The tooling available for Docs as Tests is primarily geared towards code-based documentation, but this does not mean that there will never be tools that integrate Docs as Tests into something like Sanity.io or WordPress. Eventually, somebody might come along and build an extension to your CMS of choice that integrates Docs as Tests right into the authoring UI, but that day hasn’t come yet.</p>

<h2 id="wrapping-up">Wrapping up</h2>

<p>If there’s one key take away from this article, it’s that while Docs as Code and Docs as Test are their own distinct ideas, they complement each other and are a winning combination. The two schools of thought are natural partners at both the philosophical and tooling level.</p>

<p>Docs as Code treats docs as… well, code. This mental model opens up a broad range of ideas and tools in software engineering for use in technical writing. Docs as Tests argues that documentation implies a slate of tests that can be run against a product. Programming as a discipline already has a robust and well-developed set of practices for unit tests that you can immediately apply using <a href="https://github.com/TheJambo/awesome-testing">any of the many tools available for testing</a>. Since your docs already live in a Git repository as code, you can add code files such as test specs into the same place that your docs are stored and edit them. If you use Doc Detective, a tool specifically built for Docs as Tests, you can even add the tests inline in your Markdown files.</p>

<p>If you’d like to see how to do documents as tests, check out any of the our <a href="/categories/#tutorial">tutorials</a>.</p>]]></content><author><name>Niko Berry</name></author><category term="docs-as-code" /><category term="docs-as-tests" /><category term="concept" /><category term="overview" /><category term="comparison" /><summary type="html"><![CDATA[Documentation has the critical role of helping users keep their footing in the storm of continuous releases driven by the iterative nature of modern product development. While many people think of documentation as creating guides and references for new features, publishing them online, and moving on to the next feature, this simply doesn’t reflect the actual challenges of technical writing in the age of continuous deployment, agile development, continuous contact, and easy access to feedback from customers. Writing is a big part of docs, of course, but maintaining those docs slides into the background as the business, product, and audience shift around them.]]></summary><media:thumbnail xmlns:media="http://search.yahoo.com/mrss/" url="https://www.docsastests.com/images/docs-as-tests-vs-docs-as-code.webp" /><media:content medium="image" url="https://www.docsastests.com/images/docs-as-tests-vs-docs-as-code.webp" xmlns:media="http://search.yahoo.com/mrss/" /></entry></feed>